Nissan Versa (N17): Bluetooth antenna
Removal and Installation
REMOVAL
1. Remove the rear seat cushion assembly. Refer to SE "Removal and Installation - Seat Cushion Assembly".
2. Remove the rear step plate (RH).
3. Remove the rear seatback side assembly (RH).
4. Remove the rear seatback assembly (RH).
5. Remove the trunk floor finisher.
6. Remove the trunk rear finisher.
7. Remove the trunk side finisher (RH).
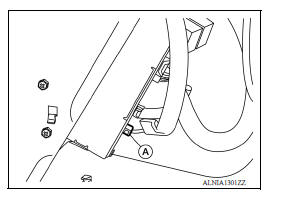
8. Disconnect the Bluetooth antenna from the bluetooth control unit (A).
9. Release the four Bluetooth antenna harness clips (B).
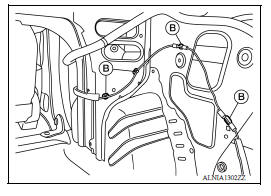
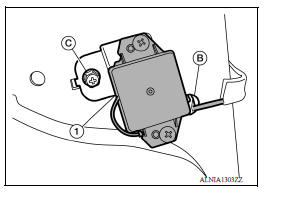
10. Release the remaining Bluetooth antenna harness clip (B) and remove the Bluetooth antenna screw (C).
11. Remove the Bluetooth antenna assembly (1).
INSTALLATION
Installation is in the reverse order of removal.
 Steering audio control switch
Removal and Installation 1. Steering wheel 2. Steering wheel audio control switches 3. Driver air bag module 4. Steering wheel rear finisher REMOVAL 1. Remove the steering wheel. Refer to ...
Bluetooth control unit
Removal and Installation REMOVAL 1. Remove the trunk floor finisher. 2. Remove the trunk rear finisher. 3. Remove the trunk side finisher (RH) 4. Disconnect the harness connector (A) from Bluet ...
Other materials:
EPS Warning lamp
Component Function Check
1.CHECK THE ILLUMINATION OF THE EPS WARNING LAMP
Check that the EPS warning lamp turns ON when ignition switch turns ON. Then,
EPS warning lamp turns
OFF after the engine is started.
Is the inspection result normal?
YES >> Inspection End.
NO >> Perform t ...
Low-pressure flexible hose
Removal and Installation
CAUTION:
Perform oil return operation before each refrigeration system disassembly.
However, if a large amount
of refrigerant or oil is detected, do not perform oil return operation. Refer to
HA "Perform Oil
Return Operation".
REMOVAL
Use refrigerant ...
Categories
- Manuals Home
- Nissan Versa Owners Manual
- Nissan Versa Service Manual
- Video Guides
- Questions & Answers
- External Resources
- Latest Updates
- Most Popular
- Sitemap
- Search the site
- Privacy Policy
- Contact Us

0.0059