Nissan Versa (N17): Bluetooth control unit
Removal and Installation
REMOVAL
1. Remove the trunk floor finisher.
2. Remove the trunk rear finisher.
3. Remove the trunk side finisher (RH)
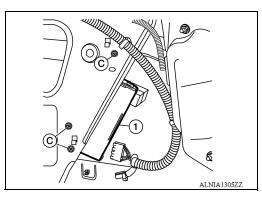
4. Disconnect the harness connector (A) from Bluetooth antenna.
5. Disconnect the harness connector (B) from Bluetooth control unit.

6. Remove the Bluetooth control unit screws (C) and the Bluetooth control unit (1).
7. Remove the Bluetooth control unit (1).
INSTALLATION
Installation is in the reverse order of removal.
 USB Connector
Removal and Installation REMOVAL 1. Remove the center console assembly. Refer to IP "Removal and Installation". 2. Release the pawl from the back of the center console to remove the ...
Steering audio control switch
Removal and Installation 1. Steering wheel 2. Steering wheel audio control switches 3. Driver air bag module 4. Steering wheel rear finisher REMOVAL 1. Remove the steering wheel. Refer to ...
Other materials:
SRS Air bag system
SRS AIR BAG SYSTEM : System Diagram
SRS AIR BAG SYSTEM : System Description
The air bag deploys if the air bag diagnosis sensor unit is activated
while the ignition switch is in the ON or
START position.
The collision modes for which supplemental restraint systems are
activated a ...
Auto door lock operation does not
operate
Diagnosis Procedure
1.CHECK AUTO LOCK SET SETTING IN WORK SUPPORT
Select INTELLIGENT KEY of BCM using CONSULT.
Select AUTO LOCK SET in WORK SUPPORT mode.
Check AUTO LOCK SET setting in WORK SUPPORT.
Refer to BCS "INTELLIGENT KEY : CONSULT Function (BCM - INTELLIGENT KEY)".
...
Categories
- Manuals Home
- Nissan Versa Owners Manual
- Nissan Versa Service Manual
- Video Guides
- Questions & Answers
- External Resources
- Latest Updates
- Most Popular
- Sitemap
- Search the site
- Privacy Policy
- Contact Us

0.0065