
Nissan Versa (N17): Refrigerant pressure sensor
Component Function Check
1.CHECK REFRIGERANT PRESSURE SENSOR OVERALL FUNCTION
- Start engine and warm it up to normal operating temperature.
- Turn A/C switch and blower fan switch ON.
- Check the voltage between ECM harness connector and ground.
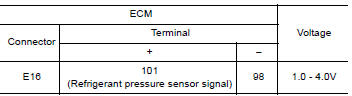
Is the inspection result normal?
YES >> INSPECTION END
NO >> Go to EC, "Diagnosis Procedure".
Diagnosis Procedure
1.CHECK GROUND CONNECTION
- Turn A/C switch and blower fan switch OFF.
- Stop engine.
- Turn ignition switch OFF.
- Check ground connection E15. Refer to Ground Inspection in GI, "Circuit Inspection".
Is the inspection result normal?
YES >> GO TO 2.
NO >> Repair or replace ground connection.
2.CHECK REFRIGERANT PRESSURE SENSOR POWER SUPPLY CIRCUIT
- Disconnect refrigerant pressure sensor harness connector.
- Turn ignition switch ON.
- Check the voltage between refrigerant pressure sensor harness connector
and ground

Is the inspection result normal?
YES >> GO TO 4.
NO >> GO TO 3.
3.DETECT MALFUNCTIONING PART
Check the following.
- Harness for open or short between ECM and refrigerant pressure sensor
>> Repair open circuit or short to ground or short to power in harness or connectors.
4.CHECK REFRIGERANT PRESSURE SENSOR GROUND CIRCUIT FOR OPEN AND SHORT
- Turn ignition switch OFF.
- Disconnect ECM harness connector.
- Check the continuity between refrigerant pressure sensor harness
connector and ECM harness connector.

- Also check harness for short to ground and short to power.
Is the inspection result normal?
YES >> GO TO 6.
NO >> GO TO 5.
5.DETECT MALFUNCTIONING PART
Check the following.
- Harness for open or short between ECM and refrigerant pressure sensor
>> Repair open circuit or short to ground or short to power in harness or connectors.
6.CHECK REFRIGERANT PRESSURE SENSOR INPUT SIGNAL CIRCUIT FOR OPEN AND SHORT
- Check the continuity between ECM harness connector and refrigerant
pressure sensor harness connector.

- Also check harness for short to ground and short to power.
Is the inspection result normal?
YES >> GO TO 8.
NO >> GO TO 7.
7.DETECT MALFUNCTIONING PART
Check the following.
- Harness for open or short between ECM and refrigerant pressure sensor
>> Repair open circuit or short to ground or short to power in harness or connectors.
8.CHECK INTERMITTENT INCIDENT
Refer to GI, "Intermittent Incident".
Is the inspection result normal?
YES >> Replace refrigerant pressure sensor. Refer to HA, "Removal and Installation".
NO >> Repair or replace.
 On board refueling vapor recovery
(ORVR)
On board refueling vapor recovery
(ORVR)
Component Function Check 1.CHECK ORVR FUNCTION Check whether the following symptoms are present. Fuel odor from EVAP canister is strong. Cannot refuel/Fuel odor from the fuel filler opening i ...
Engine control system symptoms
Symptom Table SYSTEM - BASIC ENGINE CONTROL SYSTEM 1 - 6: The numbers refer to the order of inspection. (continued on next table) SYSTEM - ENGINE MECHANICAL & OTHER ...
Other materials:
P0740 Torque converter
DTC Logic
DTC DETECTION LOGIC
DTC
Trouble diagnosis name
DTC detection condition
Possible causes
P0740
Torque Converter Clutch Circuit/
Open
The follow diagnosis conditions
are met, and the TCM torque
converter clutch solenoid valve
current monitor readin ...
P285A Clutch B pressure
DTC Logic
DTC DETECTION LOGIC
DTC
Trouble diagnosis name
DTC detection condition
Possible causes
P285A
Clutch B pressure disengagement
performance
The detection conditions continuously for 200
msec or more under the following diagnosis
conditions:- Diagnosis ...
Categories
- Manuals Home
- Nissan Versa Owners Manual
- Nissan Versa Service Manual
- Video Guides
- Questions & Answers
- External Resources
- Latest Updates
- Most Popular
- Sitemap
- Search the site
- Privacy Policy
- Contact Us

0.0095