
Nissan Versa (N17): EPS Control unit
Exploded View
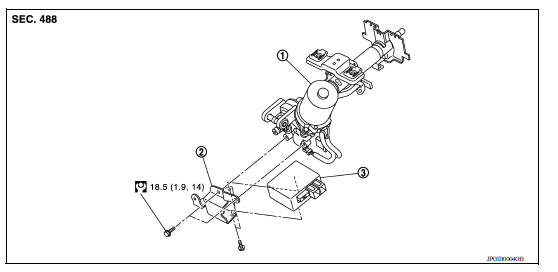
1. Steering column assembly 2. Bracket 3. EPS control unit
Removal and Installation
REMOVAL
- Perform a CPU memory erase on the EPS with CONSULT before removal.
CAUTION:
- Disconnect battery negative terminal before continuing.
- Do not shock EPS control unit, e.g. drop or hit.
- Do not get EPS control unit wet with water or other liquid. Also, do not give EPS control unit a radical temperature change to avoid getting water drops.
- Do not disassemble or remodel EPS control unit, EPS motor, torque sensor, harness and connectors.
- Remove instrument lower panel LH. Refer to IP "Removal and Installation".
- Disconnect harness connectors from EPS control unit.
CAUTION: Hold and pull the connector housing, do not pull on harness when disconnecting connectors.
Also, do not grip, collapse or apply excessive force to the connector.
- Remove EPS control unit from steering column assembly.
- Remove bracket from steering column assembly if necessary.
INSTALLATION
Installation is in the reverse order of removal.
- Check that harness is not damaged when installing EPS control unit. Also, check that EPS control unit is installed without trapping harness on foreign materials.
- After installing steering column assembly, perform self-diagnosis with CONSULT to ensure correct operation.
 Unbalance steering wheel turning force (torque variation)
Description Unbalance steering wheel turning force (torque variation). Diagnosis Procedure 1.PERFORM SELF-DIAGNOSIS With CONSULT Turn the ignition switch OFF to ON. Perform "EPS" self-diagn ...

Other materials:
Rear door finisher
Exploded View
1. Rear door panel 2. Rear door finisher 3. Rear power window switch finisher
(if
equipped)
4. Grommet Clip
Metal clip
Pawl
Removal and Installation
REMOVAL
Fully open rear door window.
Remove rear door finisher clip (A).
Remove rear power window switch and f ...
Kicking plate inner
KICKING PLATE INNER : Removal and Installation
FRONT KICKING PLATE
Removal
1. Release front kicking plate pawls using a
suitable tool (A) and
remove front kicking plate as shown.
CAUTION:
Apply protective tape (B) to the body as shown before
releasing the pawl ...
Categories
- Manuals Home
- Nissan Versa Owners Manual
- Nissan Versa Service Manual
- Video Guides
- Questions & Answers
- External Resources
- Latest Updates
- Most Popular
- Sitemap
- Search the site
- Privacy Policy
- Contact Us

0.007