
Nissan Versa (N17): Water hose
Exploded View
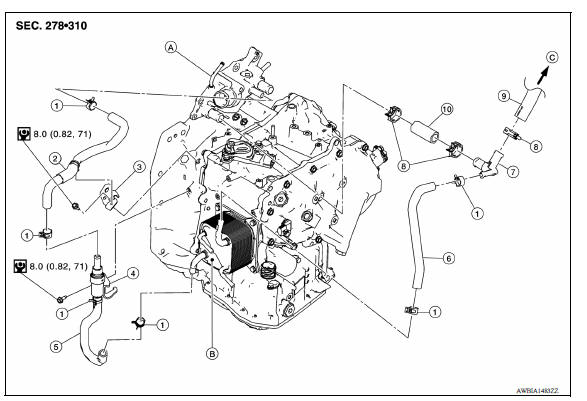
1. Hose clamp 2. Water hose A 3. Bracket 4. Heater thermostat 5. Water hose B 6. Water hose C 7. Water bypass pipe 8. Hose clamp 9. Heater hose 9. Water hose D A. Water outlet B. Oil warner C. To heater core
Removal and Installation
REMOVAL
WARNING: Do not remove the radiator cap when the engine is hot. Serious burns could occur from high pressure coolant escaping from the radiator.
CAUTION: Perform these steps after the coolant temperature has cooled sufficiently.
- Remove the hose clamp and pull out the water hose A.
- Remove the hose clamp and pull out the water hose B.
- Remove the hose clamp and pull out the water hose C.
- Pull out the heater hose and remove the water bypass pipe.
- Remove the heater thermostat assembly.
- Remove the bracket.
INSTALLATION
Installation is in the reverse order of removal.
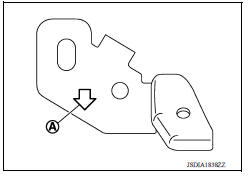
- To install bracket to the CVT assembly, face the front arrow (A) of the bracket toward front of vehicle.
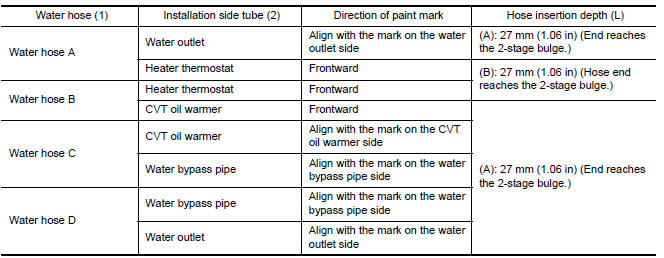
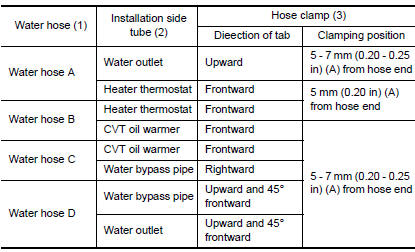
- Refer to the following when installing water hoses.
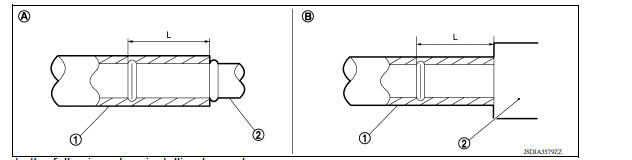
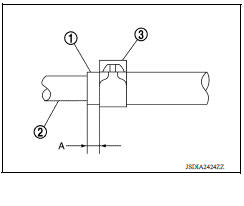
- Refer to the following when installing hose clamp.
CAUTION: Hose clamp should not interfere with the bulge of fluid cooler tube.
Inspection
INSPECTION AFTER REMOVAL
Heater Thermostat
- Fully immerse the heater thermostat (1) in a container (A) filled with water. Continue heating the water while stirring.
- Continue heating the heater thermostat for 5 minutes or more after bringing the water to a boil.
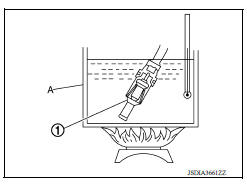
3. Quickly take the heater thermostat out of the hot water, measure the heater thermostat within 10 seconds.
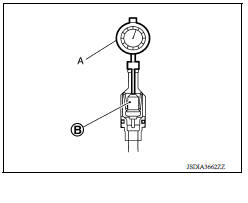
- Place dial indicator (A) on the pellet (B) and measure the elongation from the initial state.
Standard : Refer to TM "Heater Thermostat".
4. If out of standard, replace heater thermostat.
INSPECTION AFTER INSTALLATION
Start the engine, and check the joints for coolant leakage.
 Differential side oil seal
Exploded View 1. Transaxle assembly 2. Differential side oil seal (left side) 3. Differential side oil seal (right side) Front Genuine NISSAN CVT Fluid NS-3 Removal and Installation NOTE ...
Fluid cooler hose
Exploded View Removal and Installation Inspection and Adjustment INSPECTION AFTER INSTALLATION Check for CVT fluid leakage. Refer to TM "Inspection". ADJUSTMENT AFTER INSTALLATION ...
Other materials:
Air cleaner and air duct
Exploded View
1. Clamp 2. PCV hose 3. Clamp
4. Mount rubber 5. Air duct (inlet) 6. Air cleaner body
7. Grommet 8. Air cleaner filter 9. Air cleaner cover
10. Mass air flow sensor 11. Air duct 12. Clamp
Removal and Installation
REMOVAL
NOTE:
Mass air flow sensor is removable as an assemb ...
Clutch master cylinder
Exploded View
1. Reservoir hose 2. Master cylinder
Removal and Installation
CAUTION:
Do not spill clutch fluid onto painted surfaces. If fluid spills,
wipe up immediately and wash the
affected area with water.
Do not disassemble clutch master cylinder.
NOTE:
When removing compo ...
Categories
- Manuals Home
- Nissan Versa Owners Manual
- Nissan Versa Service Manual
- Video Guides
- Questions & Answers
- External Resources
- Latest Updates
- Most Popular
- Sitemap
- Search the site
- Privacy Policy
- Contact Us

0.0054