Nissan Versa (N17): Trunk lid opener handle
TRUNK LID OPENER HANDLE : Removal and Installation
REMOVAL
1. Remove front kicking plate (LH). Refer to INT "KICKING PLATE INNER : Removal and Installation".
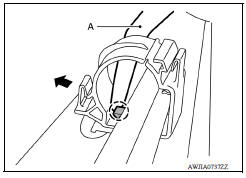
2. Disengage pawl using a suitable tool (A) and open the harness clip.
 : Pawl

3. Position floor carpet aside as necessary to access the trunk lid opener handle bolts.
4. Remove the trunk lid opener handle bolts.
5. Remove trunk lid opener cable from trunk lid opener handle.
INSTALLATION
Installation is in the reverse order of removal.
CAUTION:
- After installation, check rear door open/close, lock/unlock operation.
- After installation, perform the rear door adjustment procedure. Refer to DLK "DOOR ASSEMBLY : Adjustment".
 Trunk lid lock
TRUNK LID LOCK : Removal and Installation REMOVAL 1. Remove trunk lid finisher (if equipped). Refer to INT "Removal and Installation". 2. Release rod holder (1) by lifting upward, and ...
Trunk lid opener cable
TRUNK LID OPENER CABLE : Removal and Installation REMOVAL 1. Remove trunk lid striker. Refer to DLK "TRUNK LID STRIKER : Removal and Installation". 2. Remove trunk side finisher (LH). R ...
Other materials:
Event Data Recorders (EDR)
This vehicle is equipped with an Event Data Recorder
(EDR). The main purpose of an EDR is to
record, in certain crash or near crash-like situations,
such as an air bag deployment or hitting a
road obstacle, data that will assist in understanding
how a vehicle's systems performed. The EDR
is de ...
Road wheel
Inspection
ALUMINUM WHEEL
Check tires for wear and improper inflation.
Check wheels for deformation, cracks and other damage. If deformed,
remove wheel and check wheel
runout.
a. Remove tire from aluminum wheel and mount wheel on a balancer machine.
b. Set dial indicator as shown.
c ...
Categories
- Manuals Home
- Nissan Versa Owners Manual
- Nissan Versa Service Manual
- Video Guides
- Questions & Answers
- External Resources
- Latest Updates
- Most Popular
- Sitemap
- Search the site
- Privacy Policy
- Contact Us
0.0062
