Nissan Versa (N17): Inside handle
INSIDE HANDLE : Removal and Installation
REMOVAL
1. Remove rear door finisher. Refer to INT "Removal and Installation".
2. Remove upper side of sealing screen.
NOTE: Cut the butyl tape so that some parts of the butyl tape remain on the sealing screen, if the sealing screen is reused.
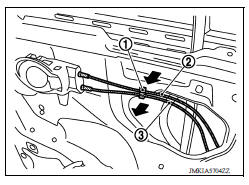
3. Disengage lock knob cable (2) and inside handle cable (3) from cable clip (1).
4. Remove inside handle bolt.
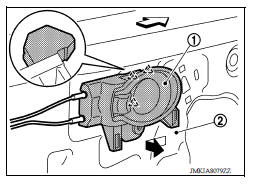
5. Disengage inside handle (1) from door panel (2) by sliding toward vehicle rear and then separating.
 : Pawl
 : Front
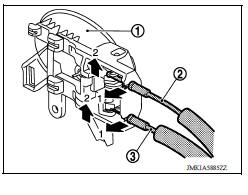
6. Disengage inside handle cable (3) and lock knob cable (2), and then remove inside handle (1).
INSTALLATION
Installation is in the reverse order of removal.
CAUTION: After installation, check door open/close, lock/unlock operation.
 Door lock
DOOR LOCK : Removal and Installation REMOVAL 1. Remove inside handle. Refer to DLK "INSIDE HANDLE : Removal and Installation". 2. Remove outside handle. Refer to DLK "OUTSIDE HANDL ...
Outside handle
OUTSIDE HANDLE : Removal and Installation REMOVAL 1. Fully close rear door glass. 2. Remove rear door finisher. Refer to INT "Removal and Installation". 3. Remove sealing screen. NOTE ...
Other materials:
Heater and Air Conditioner (manual)
WARNING
The air conditioner cooling function operates
only when the engine is running.
Do not leave children or adults who
would normally require the assistance
of others alone in your vehicle. Pets
should also not be left alone. They
could accidentally injure themselves or
others ...
Camshaft
Exploded View
1. Camshaft bracket (No. 2 to 5) 2. Camshaft bracket (No. 1) 3. Camshaft
sprocket (EXH)
4. Exhaust valve timing control solenoid
valve 5. Oring 6. Camshaft sprocket (INT)
7. Plug (EXH) 8. Washer (EXH) 9. Oil filter (for exhaust valve timing control
solenoid valve)
10. Cylinde ...
Categories
- Manuals Home
- Nissan Versa Owners Manual
- Nissan Versa Service Manual
- Video Guides
- Questions & Answers
- External Resources
- Latest Updates
- Most Popular
- Sitemap
- Search the site
- Privacy Policy
- Contact Us

0.0087