Nissan Versa (N17): Shift lock system
Component Function Check
1.CHECK SHIFT LOCK OPERATION (BRAKE PEDAL RELEASED)
- Ignition switch ON.
- Attempt to shift selector lever to any position other than Park with brake pedal released.
Can the selector lever be shifted?
YES >> Go to TM "Diagnosis Procedure".
NO >> GO TO 2.
2.CHECK SHIFT LOCK OPERATION (BRAKE PEDAL APPLIED)
Attempt to shift the selector lever to any position other than Park with brake pedal applied.
Can the selector lever be shifted?
YES >> Inspection End.
NO >> Go to TM "Diagnosis Procedure".
Diagnosis Procedure
1.CHECK STOP LAMP SWITCH
- Ignition switch ON.
- Check voltage between stop lamp switch connector E13 terminal 4 and
ground.

Is the inspection result normal?
YES >> GO TO 2.
NO >> GO TO 4.
2.CHECK A/T SHIFT SELECTOR
Check voltage between A/T shift selector connector M37 terminal 6 and ground. 
Is the inspection result normal?
YES >> GO TO 3.
NO >> GO TO 5.
3.CHECK GROUND CIRCUIT
- Ignition switch OFF.
- Disconnect A/T shift selector connector.
- Check continuity between A/T shift selector connector M37 terminal 6 and
ground.

Is the inspection result normal?
YES >> Replace A/T shift selector. Refer to TM "Removal and Installation".
NO >> Repair or replace ground circuit.
4.CHECK STOP LAMP SWITCH POWER CIRCUIT
Check voltage between stop lamp switch connector E13 terminal 3 and ground. 
Is the inspection result normal?
YES >> Replace stop lamp switch.
NO >> Repair or replace power circuit.
5.CHECK A/T SHIFT SELECTOR POWER CIRCUIT
Check voltage between A/T shift selector connector M37 terminal 5 and ground. 
Is the inspection result normal?
YES >> Replace A/T shift selector. Refer to TM "Removal and Installation".
NO >> Repair or replace power circuit.
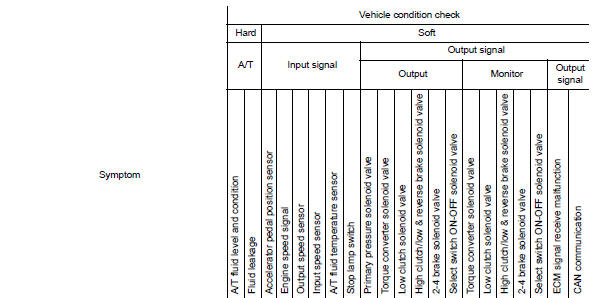
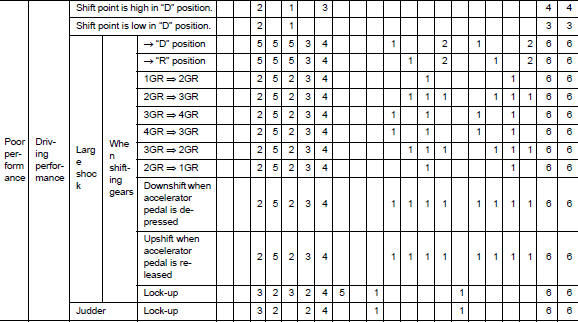
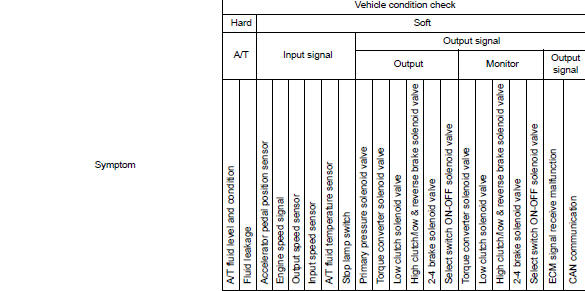
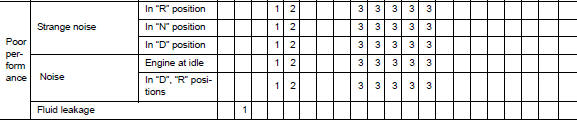
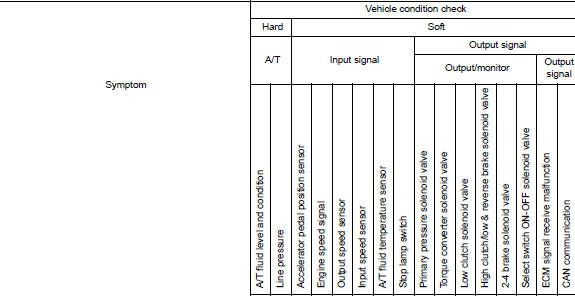
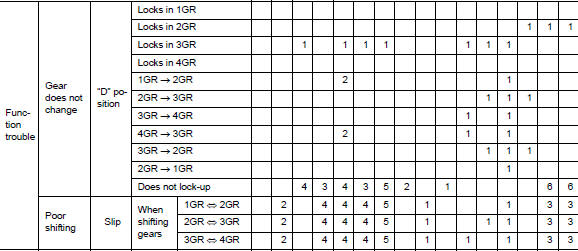
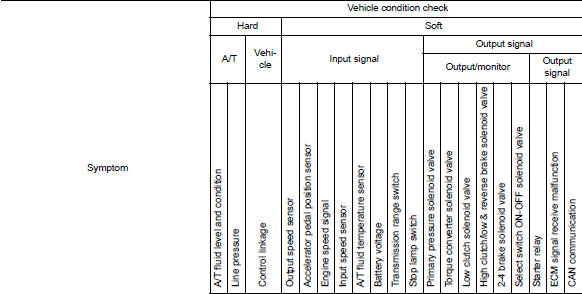
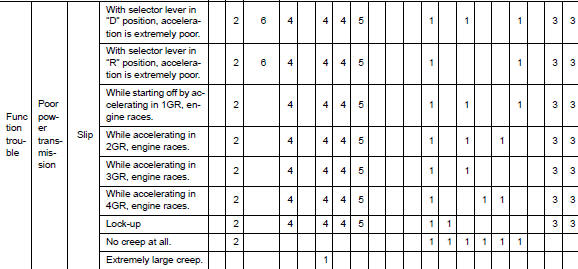
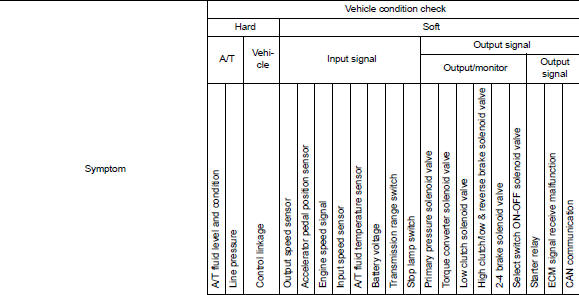
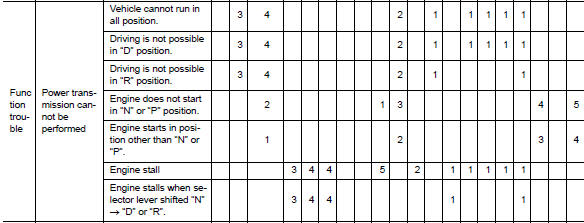
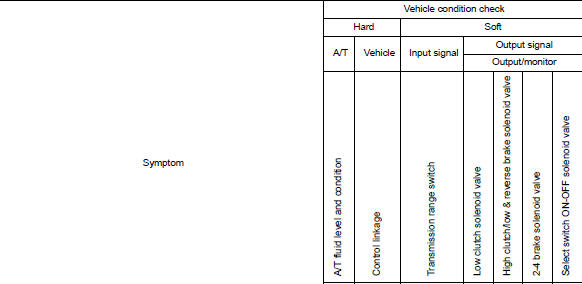
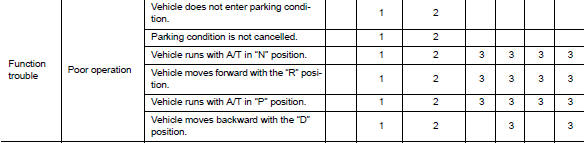
System symptom
Symptom Table
The diagnosis item numbers show the sequence for inspection. Inspect in order from item 1.
CAUTION: If any malfunction occurs in the RE4F03C transmission, replace the transaxle assembly.
 Shift position indicator circuit
Component Parts Function Inspection 1.CHECK SHIFT POSITION INDICATOR Start the engine. Shift the selector lever. Check that the selector lever position and the shift position indicator o ...
A/T Fluid
Inspection FLUID LEAKAGE Check transaxle surrounding area (oil seal and plug etc.)for fluid leakage. If anything is found, repair or replace damaged parts and adjust A/ T fluid level. Ref ...
Other materials:
U0300 Can communication data
Description
The amount of data transmitted from each control unit is read.
DTC Logic
DTC DETECTION LOGIC
DTC
Trouble diagnosis name
DTC detection condition
Possible causes
U0300
Internal Control Module Software
Incompatibility
When the amount of data transmitt ...
U0155 Lost communication (IPC)
Description
CAN (Controller Area Network) is a serial communication line for real-time
application. It is an on-vehicle multiplex
communication line with high data communication speed and excellent malfunction
detection ability.
Many electronic control units are equipped onto a vehicle, and ...
Categories
- Manuals Home
- Nissan Versa Owners Manual
- Nissan Versa Service Manual
- Video Guides
- Questions & Answers
- External Resources
- Latest Updates
- Most Popular
- Sitemap
- Search the site
- Privacy Policy
- Contact Us

0.0074