 Nissan Versa Sedan Service ManualEngine » Engine cooling system (CO)
Water pump
Water pump
Exploded View
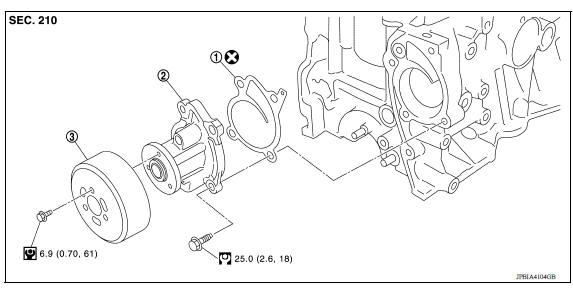
1. Gasket 2. Water pump 3. Water pump pulley
Removal and Installation
REMOVAL
CAUTION:
Do not remove the radiator cap when the engine is hot. Serious burns could occur from highpressure engine coolant escaping from the radiator. Wrap a thick cloth around the radiator cap. Slowly turn it a quarter of a turn to release builtup pressure. Carefully remove radiator cap by turning it all the way.
- Drain engine coolant from radiator.
CAUTION:
- Perform this step when the engine is cold.
- Do not spill engine coolant on drive belt.
- Remove front wheel and tire (RH).
- Remove front fender protector (RH).
- Loosen water pump pulley bolts before loosening belt tension of drive belt.
- Remove drive belt.
- Remove water pump pulley.
- Remove water pump.
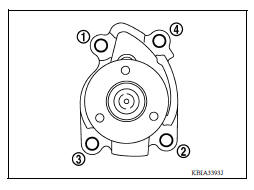
- Loosen water pump bolts in reverse order as shown.
- Engine coolant will leak from cylinder block, so have a receptacle
ready below.
CAUTION: - Do not allow water pump vane to contact any other parts.
- Water pump cannot be disassembled and must be replaced as an assembly.
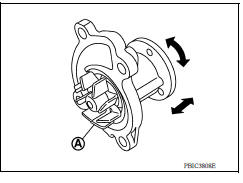
INSPECTION AFTER REMOVAL
- Visually check for significant dirt or rust on the water pump body and vane (A) and replace as necessary.
- Check that the vane shaft turns smoothly by hand and is not excessively loose.
- Replace the water pump assembly if the water pump does not perform properly.
INSTALLATION
Installation is in the reverse order of removal.
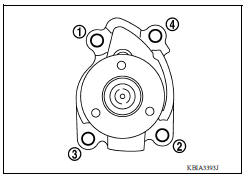
- Tighten water pump bolts in order as shown.
CAUTION:
- Do not allow the water pump vane to contact any other parts.
- Water pump cannot be disassembled and must be replaced as an assembly.
- Do not reuse gasket.
- Sealing surface must be clean and free of dents or flaws.
INSPECTION AFTER INSTALLATION
- Before starting engine, check oil/fluid levels, including engine coolant and engine oil. If less than required quantity, fill to the specified level.
- Use procedure below to check for fuel leakage.
- Turn ignition switch ON (with engine stopped). With fuel pressure applied to fuel piping, check for fuel leakage at connection points.
- Start engine. With engine speed increased, check again for fuel leakage at connection points.
- Run engine to check for unusual noise and vibration.
NOTE:
If hydraulic pressure inside timing chain tensioner drops after removal and installation, slack in the guide may generate a pounding noise during and just after engine start. However, this is normal. Noise will stop after hydraulic pressure rises.
- Warm up engine thoroughly to make sure there is no leakage of fuel, exhaust gas, or any oils/fluids, including engine oil and engine coolant.
- Bleed air from passages in lines and hoses, such as in cooling system.
- fter cooling down engine, again check oil/fluid levels, including engine oil and engine coolant. Refill to specified level, if necessary.
- Summary of the inspection items:
| Item | Before starting engine | Engine running | After engine stopped | |
| Engine coolant | Level | Leakage | Level | |
| Engine oil | Level | Leakage | Level | |
| Transmission/ transaxle fluid | A/T and CVT Models | Leakage | Level/Leakage | Leakage |
| M/T Models | Level/Leakage | Leakage | Level/Leakage | |
| Other oils and fluids* | Level | Leakage | Level | |
| Fuel | Leakage | Leakage | Leakage | |
| Exhaust gas | Leakage | |||
*Power steering fluid, brake fluid, etc.
Precaution
Description
Engine coolant
Radiator
Cooling fan
Water pump
Thermostat
Water outlet
Nissan Versa Sedan Service Manual
Categories
