
Nissan Versa (N17): Compression pressure
Inspection
- Warm up engine and then turn it off.
- Release fuel pressure.
- Remove ignition coil and spark plug from each cylinder.
- Connect engine tachometer (not required in use of CONSULT).
- Install compression gauge (B) with an adapter (A) (commercial service tool) onto spark plug hole.
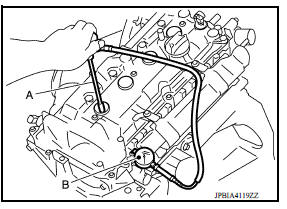
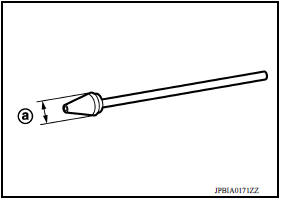
- Use an adapter with a diameter (a) smaller than 20 mm (0.79 in). Otherwise, it may be caught by cylinder head during removal.
(a) : Less than 20 mm (0.79 in)
- With accelerator pedal fully depressed, turn ignition switch to START for cranking. When the gauge pointer stabilizes, read the compression pressure and the engine rpm. Perform these steps to check each cylinder.
CAUTION:
Always use a fully charged battery to obtain the specified engine speed.
- If the engine speed is out of the specified range, check the battery. Check the engine speed again with a fully charged battery.
- If some cylinders have low compression pressure, pour a small amount of engine oil into the spark plug hole to recheck the compression.
- If the added engine oil improves the compression, the piston rings may be worn or damaged. Check the piston rings and replace if necessary.
- If the compression pressure remains low despite the addition of engine oil, the valves may be malfunctioning. Check the valves for damage. Replace the valve or valve seat as necessary.
- If two adjacent cylinders have respectively low compression pressure and their compression remains low even after the addition of engine oil the head gasket may be leaking, or valves in adjacent cylinders may be damaged. Inspect and repair as required.
- If the compression pressure is below the minimum value, check the valve clearances and parts associated with the combustion chamber (valve, valve seat, piston, piston ring, cylinder bore, cylinder head, cylinder head gasket). After repairing, measure the compression pressure again.
- After inspection is completed, install removed parts.
- Start the engine, and ensure that the engine runs smoothly.
- Perform trouble diagnosis. If DTC appears, erase it.
 Camshaft valve clearance
Inspection and Adjustment INSPECTION Perform inspection as follows after removal, replacement or installation of camshaft or valverelated parts, or if there are unusual engine conditions regardin ...
Noise, vibration and harshness (NVH) troubleshooting
NVH troubleshooting Chart Locate the area where noise occurs. Confirm the type of noise. Specify the operating condition of engine. Check specified noise source If necessary, repair ...
Other materials:
Push-button ignition switch (if so equipped)
WARNING
Do not operate the push-button ignition
switch while driving the vehicle except in
an emergency. (The engine will stop when
the ignition switch is pushed 3 consecutive
times in quick succession or the ignition
switch is pushed and held for more
than 2 seconds.) If the engine stops ...
Jump starting
To start your engine with a booster battery, the
instructions and precautions below must be followed.
WARNING
If done incorrectly, jump starting can
lead to a battery explosion, resulting in
severe injury or death. It could also
damage your vehicle.
Explosive hydrogen gas is always pre ...
Categories
- Manuals Home
- Nissan Versa Owners Manual
- Nissan Versa Service Manual
- Video Guides
- Questions & Answers
- External Resources
- Latest Updates
- Most Popular
- Sitemap
- Search the site
- Privacy Policy
- Contact Us

0.0105