
Nissan Versa (N17): Diagnosis and repair workflow
Workflow
OVERALL SEQUENCE
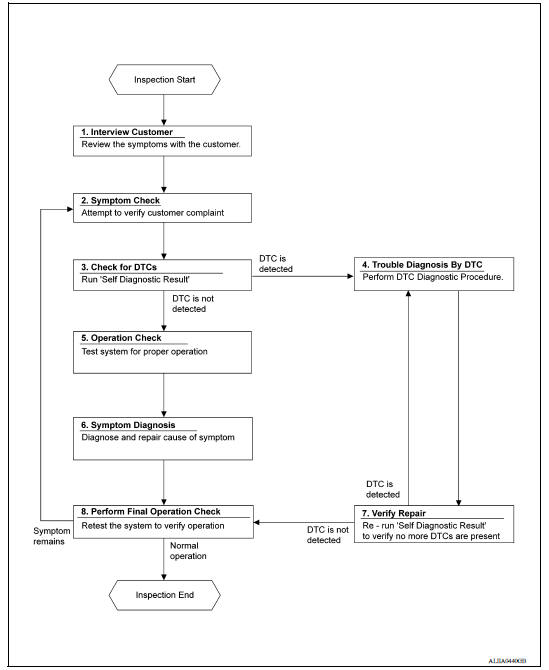
DETAILED FLOW
1.INTERVIEW CUSTOMER
Interview the customer to obtain as much information as possible about the conditions and environment under which the malfunction occurred.
>> GO TO 2.
2.SYMPTOM CHECK
Verify symptoms.
>> GO TO 3.
3.CHECK FOR DTCS
With CONSULT
- Turn ignition switch ON.
- Select "Self Diagnostic Result" mode of "BCM" using CONSULT.
- Check DTC.
Is any DTC detected?
YES >> GO TO 4.
NO >> GO TO 5.
4.PERFORM DTC DIAGNOSTIC PROCEDURE
Perform the diagnostic procedure for the detected DTC. Refer to BCS"DTC Inspection Priority Chart" or BCS "DTC Inspection Priority Chart".
>> GO TO 7.
5.OPERATION CHECK
Perform the operation check. Refer to HAC "Work Procedure".
>> GO TO 6.
6.SYMPTOM DIAGNOSIS
Check the symptom diagnosis table. Refer to HA "Symptom Table".
>> GO TO 8.
7.VERIFY REPAIR.
With CONSULT
- Turn ignition switch ON.
- Select "Self Diagnostic Result" mode of "BCM" using CONSULT.
- Check DTC.
Is any DTC detected?
YES >> GO TO 4.
NO >> GO TO 8.
8.PERFORM FINAL OPERATION CHECK
Perform the operation check. Refer to HAC "Work Procedure".
Does it operate normally?
YES >> Inspection End.
NO >> GO TO 2.
 Refrigeration system
Refrigerant Cycle REFRIGERANT FLOW The refrigerant flows in the standard pattern, that is, through the compressor, the condenser with liquid tank, through the evaporator, and back to the compress ...
Refrigerant
Description CONNECTION OF SERVICE TOOLS AND EQUIPMENT 1. Shut-off valve 2. A/C service valve 3. Recovery/recycling/recharging equipment 4. Vacuum pump 5. Manifold gauge set 6. Refrigerant con ...
Other materials:
Oil pan (upper) and oil strainer
Exploded View
1. Rear oil seal 2. Oring 3. Oil pan (upper)
4. Oil pump chain tensioner (for oil
pump drive chain)
5. Oil pump drive chain 6. Crankshaft key
7. Crankshaft sprocket 8. Oil pump sprocket 9. Oil pump
10. Oring 11. Oring 12. Oil pan drain plug
13. Drain plug washer 14. Oil pan ...
Precautions
Precaution for Supplemental Restraint System
(SRS) "AIR BAG" and "SEAT BELT PRE-TENSIONER"
The Supplemental Restraint System such as "AIR BAG" and "SEAT BELT PRE-TENSIONER",
used along
with a front seat belt, helps to reduce the risk or severity of injury to the
driver and ...
Categories
- Manuals Home
- Nissan Versa Owners Manual
- Nissan Versa Service Manual
- Video Guides
- Questions & Answers
- External Resources
- Latest Updates
- Most Popular
- Sitemap
- Search the site
- Privacy Policy
- Contact Us

0.0055