
Nissan Versa (N17): Refrigeration system
Refrigerant Cycle
REFRIGERANT FLOW
The refrigerant flows in the standard pattern, that is, through the compressor, the condenser with liquid tank, through the evaporator, and back to the compressor. The refrigerant evaporation through the evaporator coils are controlled by externally equalized expansion valve, located inside the evaporator case.
Refrigerant System Protection
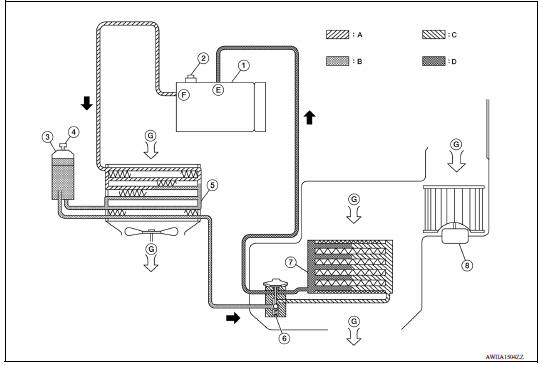
1. A/C compressor 2. Pressure relief valve 3. Liquid tank 4. Refrigerant pressure sensor 5. Condenser 6. Expansion valve 7. Evaporator 8. Blower motor A. High-pressure gas B. High-pressure liquid C. Low-pressure liquid D. Low-pressure gas E. Suction port F. Discharge port G Outside air
REFRIGERANT PRESSURE SENSOR
The refrigerant system is protected against excessively high or low pressures by the refrigerant pressure sensor, located on the condenser. If the system pressure rises above or falls below the specifications, the refrigerant pressure sensor detects the pressure inside the refrigerant line and sends a voltage signal to the ECM.
The ECM de-energizes the A/C relay to disengage the magnetic compressor clutch when pressure on the high pressure side detected by refrigerant pressure sensor is over about 2,746 kPa (28 kg/cm2, 398 psi), or below about 120 kPa (1.22 kg/cm2, 17.4 psi).
PRESSURE RELIEF VALVE
The refrigerant system is also protected by a pressure relief valve, located in the rear head of the compressor.
When the pressure of refrigerant in the system increases to an abnormal level [more than 2,990 kPa (30.5 kg/ cm2, 433.6 psi)], the release port on the pressure relief valve automatically opens and releases refrigerant into the atmosphere.
Component
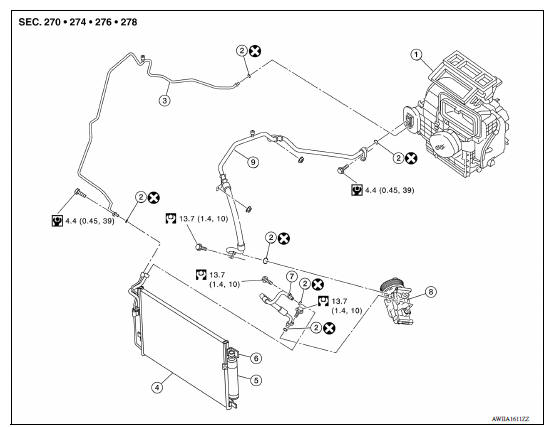
1. A/C unit assembly 2. O-ring 3. High-pressure pipe 4. Condenser 5. Liquid tank 6. Refrigerant pressure sensor 7. High-pressure flexible hose 8. Compressor 9. Low-pressure flexible hose
NOTE: Refer to HA "Precaution for Refrigerant Connection".
BASIC INSPECTION
 Component parts
Component Parts Location 1. Condenser 2. Compressor 3. Refrigerant pressure sensor 4. Liquid tank 5. Evaporator 6. Expansion valve A. Built-in heater & cooling unit assembly Component Des ...
Diagnosis and repair workflow
Workflow OVERALL SEQUENCE DETAILED FLOW 1.INTERVIEW CUSTOMER Interview the customer to obtain as much information as possible about the conditions and environment under which the malfunctio ...
Other materials:
Camshaft
Exploded View
1. Camshaft bracket (No. 2 to 5) 2. Camshaft bracket (No. 1) 3. Camshaft
sprocket (EXH)
4. Exhaust valve timing control solenoid
valve 5. Oring 6. Camshaft sprocket (INT)
7. Plug (EXH) 8. Washer (EXH) 9. Oil filter (for exhaust valve timing control
solenoid valve)
10. Cylinde ...
Engine control system
ENGINE CONTROL SYSTEM : Component Parts Location
1. Mass air flow sensor
(with intake air temperature sensor)
2. Electric throttle control actuator
(with built in throttle position sensor
and throttle control motor)
3. EVAP canister purge volume control
solenoid valve
4. Cooling fan mot ...
Categories
- Manuals Home
- Nissan Versa Owners Manual
- Nissan Versa Service Manual
- Video Guides
- Questions & Answers
- External Resources
- Latest Updates
- Most Popular
- Sitemap
- Search the site
- Privacy Policy
- Contact Us

0.0064