
Nissan Versa (N17): Rear seat
Exploded View - Fixed Seatback
FIXED SEATBACK
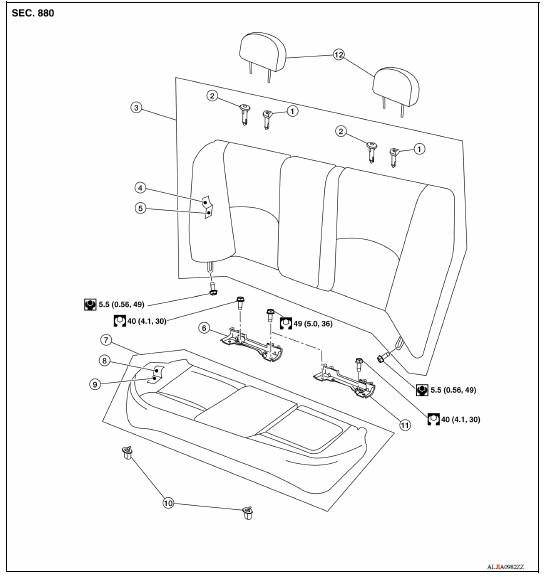
1. Headrest holder (locked) 2. Headrest holder (free) 3. Rear seatback assembly 4. Seatback trim 5. Seatback pad 6. LATCH bracket (RH) 7. Seat cushion assembly 8. Seat cushion trim 9. Seat cushion pad 10. Seat cushion hook 11. LATCH bracket (LH) 12. Headrest
Exploded View - 60:40 Split Seatback
60:40 SPLIT SEATBACK
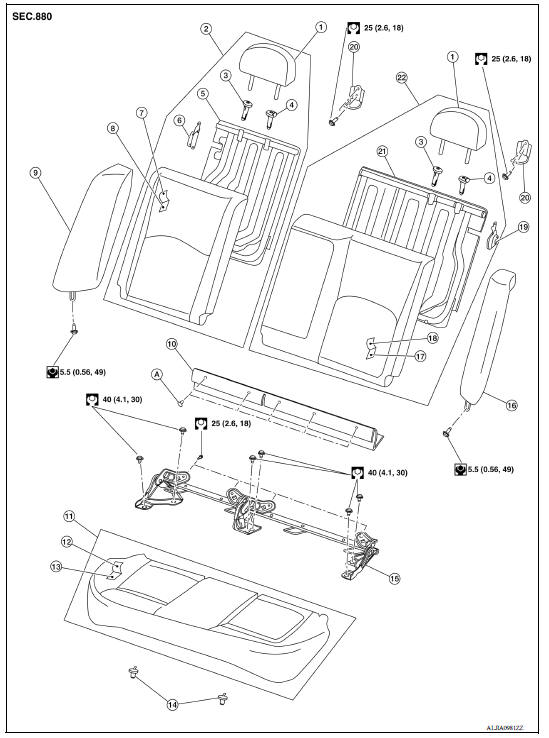
1. Headrest 2. Rear seatback assembly (RH) 3. Headrest holder (free) 4. Headrest holder (locked) 5. Rear seatback frame (RH) 6. Seatback latch assembly (RH) 7. Seatback trim (RH) 8. Seatback pad (RH) 9. Rear seat bolster (RH) 10. Seatback hinge finisher 11. Seat cushion assembly 12. Seat cushion trim 13. Seat cushion pad 14. Seat cushion hook 15. Seatback hinge assembly 16. Rear seat bolster (LH) 17. Seatback pad (LH) 18. Seatback trim (LH) 19. Seatback latch assembly (LH) 20. Seatback striker 21. Rear seatback frame (LH) 22. Rear seatback assembly (LH) A. Seatback hinge finisher clips
Disassembly and Assembly - Seat Cushion
SEAT CUSHION
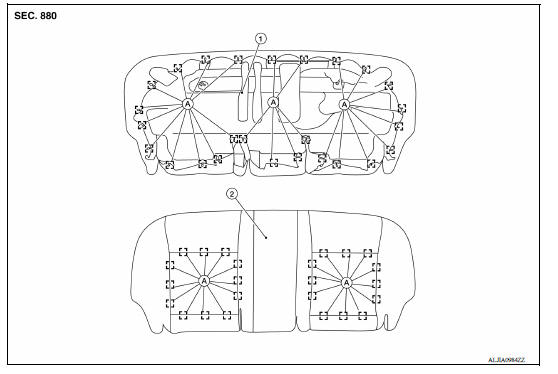
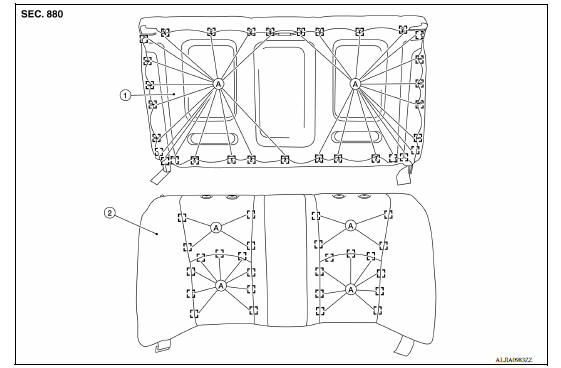
1. Seat cushion pad 2. Seat cushion trim A. Hog rings
Disassembly
- Remove the seat cushion assembly. Refer to SE "Removal and Installation - Seat Cushion Assembly".
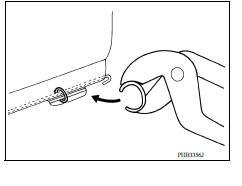
- Remove the hog rings on the bottom side of seat cushion.
- Remove the hog rings on the top side of seat cushion and separate the seat cushion trim from the seat cushion pad.
NOTE: Remove all pieces of hog rings and discard them.
Assembly
Assembly is in the reverse order of disassembly.
CAUTION:
- Make sure hog rings are correctly fastened around both the seat cushion trim and seat cushion pad wires.
- Replace any deformed or damaged hog rings.
- Make sure any old hog ring pieces are removed from seat.
NOTE:
- Install new hog rings on the seat cushion trim in original positions.
- Use only one hog ring in each designated location.
Disassembly and Assembly - Fixed Seatback
FIXED SEATBACK
1. Seatback pad 2. Seatback trim A. Hog rings
Disassembly
- Remove the rear seatback assembly. Refer to SE "Removal and Installation - Fixed Seatback".
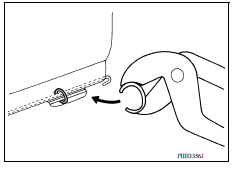
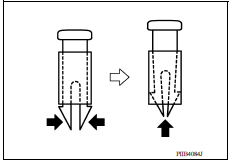
- Release locks as shown and remove the headrest holders.
CAUTION: Before removing/installing the headrest holder, check its orientation (front/rear and right/left)
3. Remove the hog rings from the back side of the rear seatback assembly.
4. Remove the hog rings from the front side of the rear seatback assembly and separate the seatback trim from the seatback pad.
NOTE: Remove all pieces of hog rings and discard them.
Assembly
Assembly is in the reverse order of disassembly.
CAUTION:
- Make sure hog rings are correctly fastened around both the seatback trim and seatback pad wires.
- Replace any deformed or damaged hog rings.
- Make sure any old hog ring pieces are removed from seat.
NOTE:
- Install new hog rings on the seatback trim in original positions.
- Use only one hog ring in each designated location.
Disassembly and Assembly - Split Seatback
DISASSEMBLY
- Remove the rear seatback assembly. Refer to SE "Removal and Installation - 60:40 Split Seatback".
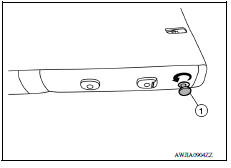
- Rotate the seatback latch release knob (1) counterclockwise and remove.
3. Release the J-hook retainer (C), the clips (A), and unzip the seatback trim zippers (B).
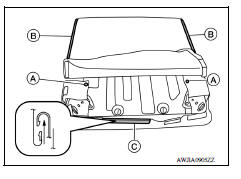
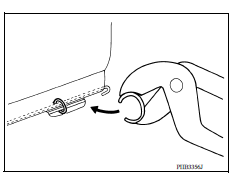
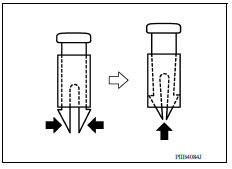
4. Reach up through the seatback trim and release locks as shown and remove the headrest holders.
CAUTION: Before removing/installing the headrest holder, check its orientation (front/rear and right/left).
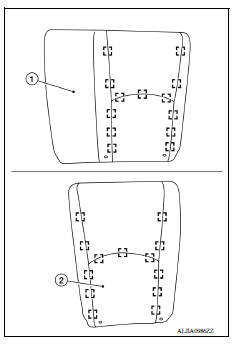
5. Remove the seatback trim and seatback pad from the seatback frame.
6. Separate the seatback trim from the seatback pad.
a. Remove the hog rings and separate the seatback trim from the seatback pad.
 : Hog ring
(1) Seatback trim (LH)
(2) Seatback trim (RH)
NOTE: Remove all pieces of hog rings and discard them.
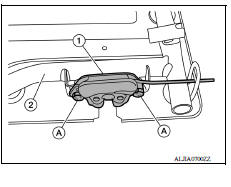
7. Remove the bolts (A) and the rear seatback latch assembly (1) from the seatback frame (2).
Assembly
Assembly is in the reverse order of disassembly.
CAUTION:
- Make sure hog rings are correctly fastened around both the seatback trim and seatback pad wires.
- Replace any deformed or damaged hog rings.
- Make sure any old hog ring pieces are removed from seat.
NOTE:
- Install new hog rings on the seatback trim in original positions.
- Use only one hog ring in each designated location.
 Passenger side
PASSENGER SIDE : Exploded View WITH REMOVABLE HEADREST 1. Seatback trim 2. Seatback pad 3. Headrest 4. Headrest holder (free) 5. Headrest holder (locked) 6. Chute rod 7. Seat frame assembly 8. ...
Door & lock (DLK)
WITH INTELLIGENT KEY SYSTEM ...
Other materials:
Starting the engine (models with NISSAN Intelligent Key system)
1. Apply the parking brake.
2. Move the shift lever to P (Park) or N (Neutral).
P (Park) is recommended.
The starter is designed not to operate if
the shift lever is in any of the driving
positions.
3. Push the ignition switch to the ON position.
Depress the brake pedal and push the ...
Low-pressure flexible hose
Removal and Installation
CAUTION:
Perform oil return operation before each refrigeration system disassembly.
However, if a large amount
of refrigerant or oil is detected, do not perform oil return operation. Refer to
HA "Perform Oil
Return Operation".
REMOVAL
Use refrigerant ...
Categories
- Manuals Home
- Nissan Versa Owners Manual
- Nissan Versa Service Manual
- Video Guides
- Questions & Answers
- External Resources
- Latest Updates
- Most Popular
- Sitemap
- Search the site
- Privacy Policy
- Contact Us

0.0063