Nissan Versa (N17): Door assembly
Door assembly : Removal and Installation
CAUTION:
- Use two people when removing or installing rear door due to its heavy weight.
- When removing and installing rear door assembly, support door using a suitable tool.
- Use shops cloths to protect surrounding components from damage during removal and installation of front door assembly.
REMOVAL
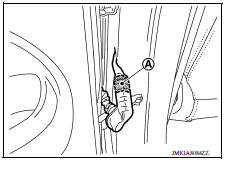
1. Remove rear door harness grommet (1) from body side outer (2), and then pull out rear door harness.
2. Disconnect the harness connector (A) from rear door.
3. Remove door check link bolts from body.
4. Remove door hinge nuts (door side) and rear door assembly.
INSTALLATION
Installation is in the reverse order of removal.
CAUTION:
- Apply anticorrosive agent onto the hinge mating surface.
- After installation, check rear door open/close, lock/unlock operation.
- Check door hinge rotating point for poor lubrication. If necessary, apply a suitable multi-purpose grease.
- After installation, perform the rear door adjustment procedure. Refer to DLK "DOOR ASSEMBLY : Adjustment".
- After adjusting, apply touch-up paint (body color) onto the head of door hinge nuts.
Door assembly : Adjustment
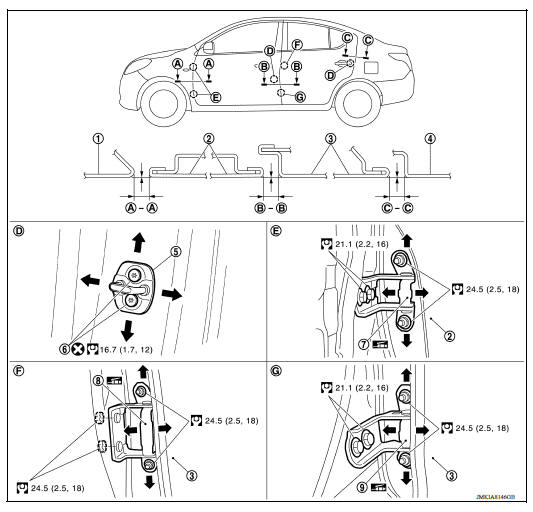
1. Front fender 2. Front door 3. Rear door 4. Body side outer 5. Door striker 6. Striker bolt 7. Front door hinge 8. Rear door hinge (upper) 9. Rear door hinge (lower)
Check the clearance and surface height between rear door and each part by visually and touching.
If the clearance and the surface height are out of specification, adjust them
according to the adjustment procedure.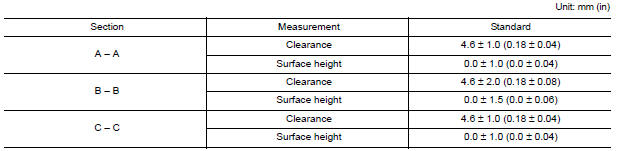
ADJUSTMENT PROCEDURE
- Remove center pillar lower finisher. Refer to INT "CENTER PILLAR LOWER FINISHER : Removal and Installation".
- Loosen door hinge nuts on door side.
- Adjust the surface height of rear door according to the specifications provided.
- Temporarily tighten door hinge nuts on door side.
- Loosen door hinge nuts and bolts on body side.
- Raise rear door at rear end to adjust clearance of rear door according to the specifications provided.
- After adjustment tighten bolts and nuts to the specified torque.
CAUTION:
- Apply touch-up paint (body color) onto the head of hinge bolts and nuts.
- Check door hinge rotating point for poor lubrication. If necessary, apply a suitable multi-purpose grease.
Install center pillar lower finisher. Refer to INT "CENTER PILLAR LOWER FINISHER : Removal and Installation".
DOOR STRIKER
DOOR STRIKER : Removal and Installation
REMOVAL
Remove striker bolts and rear door striker.
INSTALLATION
Installation is in the reverse order of removal.
CAUTION:
- After installation, check rear door open/close, lock/unlock operation.
- After installation, perform the rear door adjustment procedure. Refer to DLK "DOOR ASSEMBLY : Adjustment".
 Door check link
DOOR CHECK LINK : Removal and Installation REMOVAL Fully close the front door window. Remove front door finisher. Refer to INT "Removal and Installation". Remove front door speake ...
Door hinge
DOOR HINGE : Removal and Installation CAUTION: Use two people when removing or installing rear door due to its heavy weight. When removing and installing rear door assembly, support door ...
Other materials:
Hood
1. Pull the hood lock release handle 1 located
below the instrument panel until the hood
springs up slightly.
2. Locate the lever 2 in between the hood and
grille and push the lever sideways with your
fingertips.
3. Raise the hood 3 .
4. Remove the support rod and insert it into the
...
Power steering fluid
Check the fluid level in the reservoir.
The fluid level should be checked when the fluid
is cold at fluid temperatures of 32 to 86ºF (0 to
30ºC). The fluid level can be checked with the
level gauge which is attached to the cap. To
check the fluid level, remove the cap. The fluid ...
Categories
- Manuals Home
- Nissan Versa Owners Manual
- Nissan Versa Service Manual
- Video Guides
- Questions & Answers
- External Resources
- Latest Updates
- Most Popular
- Sitemap
- Search the site
- Privacy Policy
- Contact Us

0.0059