Nissan Versa (N17): Door hinge
DOOR HINGE : Removal and Installation
CAUTION:
- Use two people when removing or installing rear door due to its heavy weight.
- When removing and installing rear door assembly, support door using a suitable tool.
- Use shop cloths to protect surrounding components from damage during removal and installation of front door assembly.
REMOVAL
- Remove rear door assembly. Refer to DLK "DOOR ASSEMBLY : Removal and Installation".
- Remove center pillar lower finisher. Refer to INT "CENTER PILLAR LOWER FINISHER : Removal and Installation".
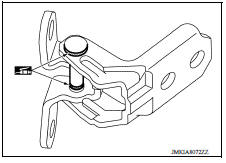
- Remove rear door hinge bolts and nuts (body side) and remove rear door hinge.
INSTALLATION
Installation is in the reverse order of removal.
CAUTION:
- Apply anticorrosive agent onto the hinge mating surface.
- After installation, check rear door open/close, lock/unlock operation.
- After installation, perform the rear door adjustment procedure. Refer to DLK "DOOR ASSEMBLY : Adjustment".
- After adjusting, apply the touch-up paint (body color) onto the head of door hinge nuts.
- Check door hinge rotating point for poor lubrication. If necessary, apply a suitable multi-purpose grease.
 Door assembly
Door check link
DOOR CHECK LINK : Removal and Installation REMOVAL Fully close the rear door window. Remove rear door finisher. Refer to INT-15, "Removal and Installation". Remove rear door speak ...
Other materials:
Input shaft and gear
Exploded View
1. Input shaft front bearing 2. Input shaft 3. Snap ring
4. Input shaft rear bearing 5. Adapter plate 6. Bushing
7. 5th input gear 8. 5th-reverse baulk ring 9. Synchronizer lever
10. 5th-reverse synchronizer hub 11. 5th-reverse coupling sleeve 12. Lock washer
13. Retaining pi ...
U0073 Communication bus A off
Description
CAN (Controller Area Network) is a serial communication line for real-time
application. It is an on-vehicle multiplex
communication line with high data communication speed and excellent malfunction
detection ability.
Many electronic control units are equipped onto a vehicle, an ...
Categories
- Manuals Home
- Nissan Versa Owners Manual
- Nissan Versa Service Manual
- Video Guides
- Questions & Answers
- External Resources
- Latest Updates
- Most Popular
- Sitemap
- Search the site
- Privacy Policy
- Contact Us

0.0074