Nissan Versa (N17): Door lock
DOOR LOCK : Removal and Installation
REMOVAL
1. Remove inside handle. Refer to DLK "INSIDE HANDLE : Removal and Installation".
2. Remove outside handle. Refer to DLK "OUTSIDE HANDLE : Removal and Installation".
3. Remove bolt (A) from the front door glass channel rear (1).
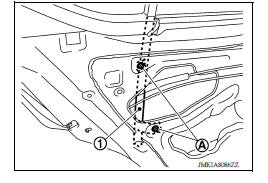
4. Disconnect the harness connector from door lock actuator.
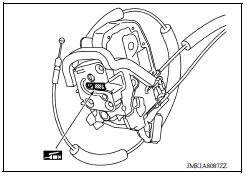
5. Remove door lock assembly bolts and door lock assembly.
INSTALLATION
Installation is in the reverse order of removal.
CAUTION:
- Do not reuse door lock assembly bolt. Always replace it with a new one when it is removed.
- After installation, check door open/close, lock/unlock operation.
- Check door lock cable is properly engaged with outside handle bracket.
- Check door lock assembly for poor lubrication. Apply a suitable multi-purpose grease to door lock if necessary.
 Outside handle
OUTSIDE HANDLE : Removal and Installation REMOVAL 1. Fully close the front door glass. 2. Remove front door finisher. Refer to INT "Removal and Installation". 3. Remove sealing screen. ...
Inside handle
INSIDE HANDLE : Removal and Installation REMOVAL 1. Remove rear door finisher. Refer to INT "Removal and Installation". 2. Remove upper side of sealing screen. NOTE: Cut the butyl tape ...
Other materials:
Car phone or CB radio
When installing a CB, ham radio or car phone in
your vehicle, be sure to observe the following
precautions; otherwise, the new equipment may
adversely affect the engine control system and
other electronic parts.
WARNING
A cellular phone should not be used for
any purpose while driving so ...
Parking/parking on hills
WARNING
Do not stop or park the vehicle over
flammable materials such as dry grass,
waste paper or rags. They may ignite
and cause a fire.
Safe parking procedures require that
both the parking brake be set and the
transmission placed into P (Park) or in
an appropriate gear for ...
Categories
- Manuals Home
- Nissan Versa Owners Manual
- Nissan Versa Service Manual
- Video Guides
- Questions & Answers
- External Resources
- Latest Updates
- Most Popular
- Sitemap
- Search the site
- Privacy Policy
- Contact Us

0.0057