
Nissan Versa (N17): Outside handle
OUTSIDE HANDLE : Removal and Installation
REMOVAL
1. Fully close the front door glass.
2. Remove front door finisher. Refer to INT "Removal and Installation".
3. Remove sealing screen.
NOTE: Cut the butyl tape so that some parts of the butyl tape remain on the sealing screen, if the sealing screen is reused.
4. For drivers side only, open rod holder (1) by pulling downward and separate key rod (3) from door lock assembly (2).
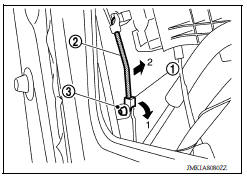
5. Disengage outside handle cable (1) from cable clip (2).
 : Front
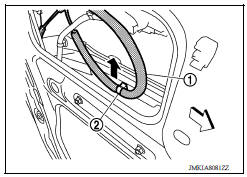
6. Remove door side grommet (1), and loosen bolt from grommet hole (2).
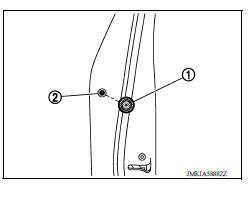
7. While pulling outside handle, remove door key cylinder assembly (LH side) or outside handle escutcheon (RH side).
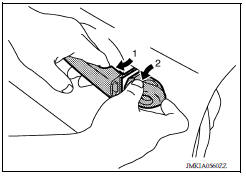
8. While pulling outside handle (1), slide toward rear of vehicle to remove outside handle.
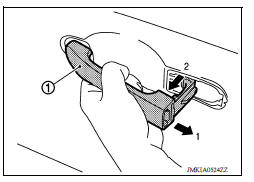
9. Remove front gasket (1) and rear gasket (2).
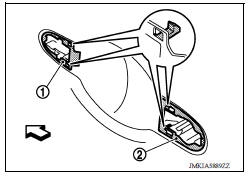
10. Slide outside handle bracket toward rear of vehicle to remove.
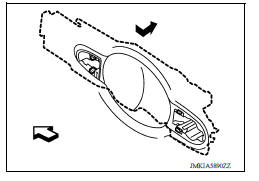
11. Disconnect outside handle cable (1) from outside handle bracket (2) as shown.
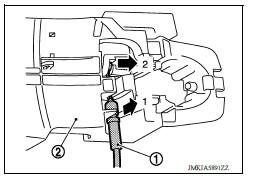
INSTALLATION
Installation is in the reverse order of removal.
CAUTION:
- Check rear door hinge rotating point for poor lubrication. if necessary, apply a suitable multi-purpose grease.
- Check that door lock cables are normally engaged with inside handle and outside handle.
- After installation, check door open/close, and lock/unlock operation.
REAR DOOR LOCK
Exploded View
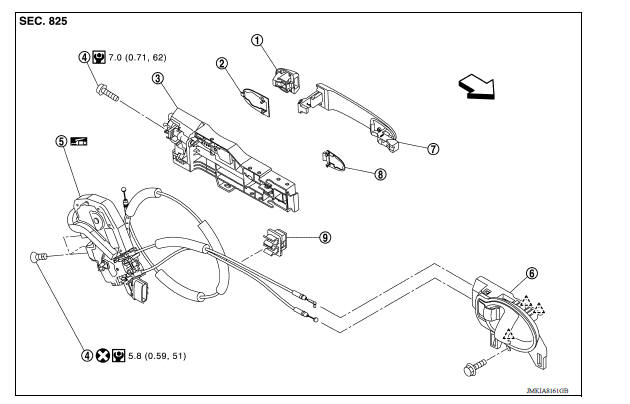
1. Outside handle escutcheon 2. Rear gasket 3. Outside handle bracket
4. Bolt 5. Door lock assembly 6. Inside handle
7. Outside handle 8. Front gasket 9. Clip
 Pawl
Pawl  Front
Front
 Inside handle
INSIDE HANDLE : Removal and Installation REMOVAL 1. Remove front door finisher. Refer to INT "Removal and Installation". 2. Remove upper side of sealing screen. NOTE: Cut the butyl tape ...
Door lock
DOOR LOCK : Removal and Installation REMOVAL 1. Remove inside handle. Refer to DLK "INSIDE HANDLE : Removal and Installation". 2. Remove outside handle. Refer to DLK "OUTSIDE HANDL ...
Other materials:
Rear drum brake
Exploded View
1. Shoe hold pin 2. Back plate 3. Plug
4. Brake shoe 5. Spring 6. Upper spring
7. Adjuster 8. Return spring 9. Brake drum
10. Boot 11. Piston 12. Piston cup
13. Spring 14. Wheel cylinder 15. Bleeder valve
16. Cap
1: Apply rubber grease.
2: Apply PBC (Poly Butyl Cuprysil) ...
Diagnosis and repair workflow
Workflow
OVERALL SEQUENCE
DETAILED FLOW
1.INTERVIEW CUSTOMER
Interview the customer to obtain as much information as possible about the
conditions and environment under
which the malfunction occurred.
>> GO TO 2.
2.SYMPTOM CHECK
Verify symptoms.
>> GO TO 3.
3.CHECK FOR DT ...
Categories
- Manuals Home
- Nissan Versa Owners Manual
- Nissan Versa Service Manual
- Video Guides
- Questions & Answers
- External Resources
- Latest Updates
- Most Popular
- Sitemap
- Search the site
- Privacy Policy
- Contact Us

0.0066