Nissan Versa (N17): Front door speaker
Removal and Installation
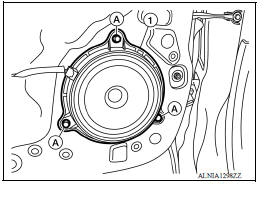
REMOVAL
1. Remove the front door finisher. Refer to INT "Removal and Installation".
2. Remove the front door speaker screws (A).
3. Disconnect the harness connector from front door speaker (1) and remove.
INSTALLATION
Installation is in the reverse order of removal.
 USB Connector
Removal and Installation REMOVAL 1. Remove the center console assembly. Refer to IP "Removal and Installation". 2. Release the pawl from the back of the center console to remove the ...
Rear door speaker
Removal and Installation REMOVAL 1. Remove the rear door finisher. Refer to INT "Removal and Installation". 2. Remove the rear door speaker screws (A). 3. Disconnect the harness connec ...
Other materials:
Break-in schedule
CAUTION
During the first 1,200 miles (2,000 km),
follow these recommendations to obtain
maximum engine performance and ensure
the future reliability and economy of your
new vehicle. Failure to follow these recommendations
may result in shortened
engine life and reduced engine
performance.
...
Evaporative emission system
EVAPORATIVE EMISSION SYSTEM : System Diagram
EVAPORATIVE EMISSION SYSTEM : System
Description
INPUT/OUTPUT SIGNAL CHART
Sensor
Input signal to ECM
ECM function
Actuator
Crankshaft position sensor (POS)
Camshaft position sensor (PHASE)
Engine speed*1
Piston ...
Categories
- Manuals Home
- Nissan Versa Owners Manual
- Nissan Versa Service Manual
- Video Guides
- Questions & Answers
- External Resources
- Latest Updates
- Most Popular
- Sitemap
- Search the site
- Privacy Policy
- Contact Us

0.005