Nissan Versa (N17): Hood hinge
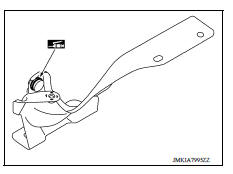
HOOD HINGE : Removal and Installation
REMOVAL
- Remove hood assembly. Refer to DLK "HOOD ASSEMBLY : Removal and Installation".
- Remove hood support rod and grommet. Refer to DLK "HOOD SUPPORT ROD : Removal andInstallation".
- Remove front fender. Refer to DLK "FRONT FENDER : Removal and Installation".
- Remove hood hinge bolts and remove hood hinge.
INSTALLATION
Installation is in the reverse order of removal.
Tighten hood hinge bolts to specified torque. Refer to DLK "HOOD ASSEMBLY : Adjustment".
CAUTION:
- Before installing the hood hinge, apply anticorrosive agent onto the surface of the vehicle.
- After installation, perform hood assembly adjustment procedure. Refer to DLK "HOOD ASSEMBLY: Adjustment".
- Check hood hinge rotating point for poor lubrication. If necessary,apply a suitable multi-purpose grease.
HOOD SUPPORT ROD
HOOD SUPPORT ROD : Removal and Installation
REMOVAL
- Support hood assembly using a suitable tool.
WARNING: Bodily injury may occur if hood assembly is not supported properly when removing hood support rod.
- Rotate and remove hood support rod from grommet.
- Release tab and remove grommet from hood hinge, if necessary.
INSTALLATION
Installation is in the reverse order of removal.
RADIATOR CORE SUPPORT
Exploded View
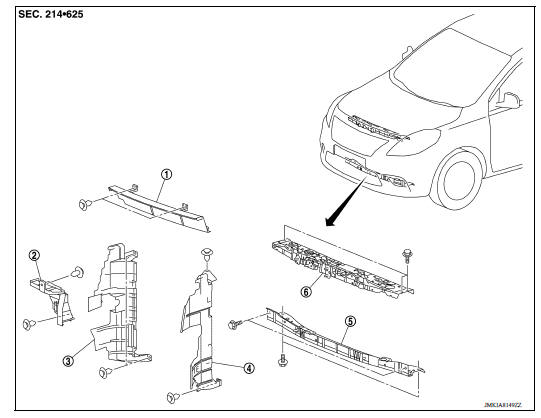
1. Radiator upper seal 2. Condenser side seal 3. Radiator side seal (RH) 4. Radiator side seal (LH) 5. Radiator core support lower 6. Radiator core support upper
 Hood assembly
Radiator core support upper
RADIATOR CORE SUPPORT UPPER : Removal and Installation RADIATOR CORE SUPPORT UPPER Removal 1. Remove ground harness bolt (A). 2. Remove horn. Refer to HRN "Removal and Installation" ...
Other materials:
Side curtain air bag module
Exploded View
1. Side curtain air bag module 2. Side curtain air bag module connector A.
Adhesive tape area
Removal and Installation
REMOVAL
CAUTION:
Before servicing, turn ignition switch OFF, disconnect both
battery terminals and wait at least three
minutes.
Do not use air t ...
Power supply and ground circuit
Diagnosis Procedure
Regarding Wiring Diagram information, refer to BCS "Wiring Diagram".
1.CHECK FUSES AND FUSIBLE LINK
Check that the following fuses and fusible link are not blown.
Is the fuse blown?
YES >> Replace the blown fuse or fusible link after repairing the a ...
Categories
- Manuals Home
- Nissan Versa Owners Manual
- Nissan Versa Service Manual
- Video Guides
- Questions & Answers
- External Resources
- Latest Updates
- Most Popular
- Sitemap
- Search the site
- Privacy Policy
- Contact Us

0.0067