Nissan Versa (N17): Inside handle
INSIDE HANDLE : Removal and Installation
REMOVAL
1. Remove front door finisher. Refer to INT "Removal and Installation".
2. Remove upper side of sealing screen.
NOTE: Cut the butyl tape so that some parts of the butyl tape remain on the sealing screen, if the sealing screen is reused.
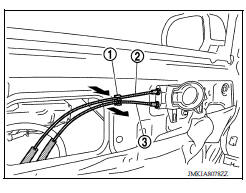
3. Release lock knob cable (2) and inside handle cable (3) from clip (1).
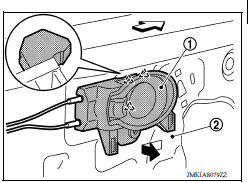
4. Remove inside handle bolt.
5. Release inside handle (1) from door panel (2) by sliding toward vehicle rear and separating.
 : Pawl
 : Front
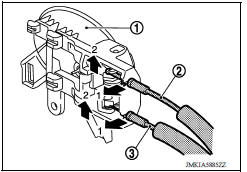
6. Disengage inside handle cable (3) and lock knob cable (2), and remove inside handle (1).
INSTALLATION
Installation is in the reverse order of removal.
CAUTION: After installation, check door open/close, lock/unlock operation.
 Door lock
DOOR LOCK : Removal and Installation REMOVAL Remove inside handle. Refer to DLK "INSIDE HANDLE : Removal and Installation". Remove outside handle. Refer to DLK "OUTSIDE HANDLE ...
Outside handle
OUTSIDE HANDLE : Removal and Installation REMOVAL 1. Fully close the front door glass. 2. Remove front door finisher. Refer to INT "Removal and Installation". 3. Remove sealing screen. ...
Other materials:
Jump starting
To start your engine with a booster battery, the
instructions and precautions below must be followed.
WARNING
If done incorrectly, jump starting can
lead to a battery explosion, resulting in
severe injury or death. It could also
damage your vehicle.
Explosive hydrogen gas is always pre ...
P0712 Transmission fluid temperature
sensor A
DTC Logic
DTC DETECTION LOGIC
DTC
Trouble diagnosis name
DTC detection condition
Possible causes
P0712
Transmission Fluid Temperature
Sensor "A" Circuit Low
Under the following diagnosis
conditions, the A/T fluid temperature
identified by TCM is
180C (3 ...
Categories
- Manuals Home
- Nissan Versa Owners Manual
- Nissan Versa Service Manual
- Video Guides
- Questions & Answers
- External Resources
- Latest Updates
- Most Popular
- Sitemap
- Search the site
- Privacy Policy
- Contact Us

0.0068