Nissan Versa (N17): License plate lamp
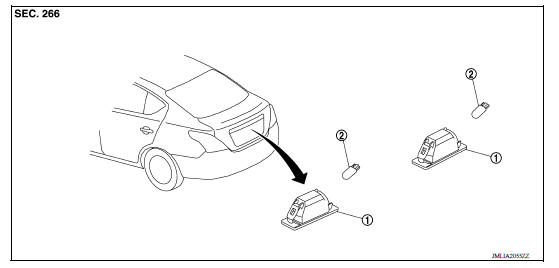
Exploded View

1. License plate lamp 2. License plate lamp bulb
Removal and Installation
REMOVAL
1. While pressing the license plate lamp housing pawl toward the right, pull the housing downward and remove.
2. Rotate the bulb socket counterclockwise and remove.
3. Remove the license plate lamp.
INSTALLATION
Installation is in the reverse order of removal.
Bulb Replacement
WARNING: Do not touch bulb with your hand while it is on or right after being turned off. Burning may result.
CAUTION:
- Disconnect the battery negative terminal or remove power circuit fuse while performing the operation.
- After installing the bulb, install the back cover and the bulb socket securely for watertightness.
- Do not touch the glass surface of the bulb with bare hands or allow oil or grease to get on it to prevent damage to the bulb.
- Do not leave bulb out of lamp reflector for a long time because dust, moisture smoke, etc. may affect the performance of lamp. When replacing bulb, be sure to replace it with new one.
LICENSE PLATE LAMP BULB
Removal
1. Remove the license plate lamp. Refer to EXL "Removal and Installation".
2. Remove the bulb from the socket.
Installation
Installation is in the reverse order of removal.
CAUTION: After installing the bulb, install the bulb socket securely for watertightness.
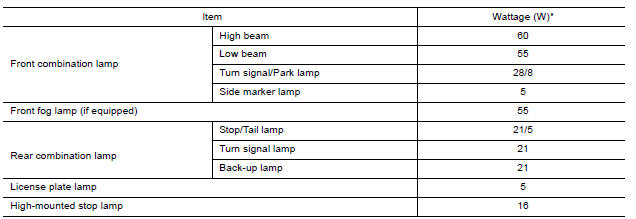
SERVICE DATA AND SPECIFICATIONS (SDS)
Bulb Specifications

*: Always check with the Parts Department for the latest parts information.
 High-mounted stop lamp
Exploded View Rear Spoiler 1. Rear spoiler 2. High-mounted stop lamp assembly Rear Parcel Shelf 1. Rear parcel shelf finisher 2. High-mounted stop lamp socket 3. High-mounted stop lamp b ...
Other materials:
Diagnosis system (EPS control unit)
CONSULT Function
FUNCTION
CONSULT can display each diagnostic item using the diagnostic test modes
shown following.
*: The following diagnosis information is erased by erasing.
DTC
Freeze frame data (FFD)
ECU IDENTIFICATION
Displays the part number stored in the con ...
Compressor
Exploded View
1. Compressor
Removal and Installation
CAUTION:
Perform oil return operation before each refrigeration system disassembly.
However, if a large amount
of refrigerant or oil is detected, do not perform oil return operation. Refer to
HA "Perform Oil
Return Operation&q ...
Categories
- Manuals Home
- Nissan Versa Owners Manual
- Nissan Versa Service Manual
- Video Guides
- Questions & Answers
- External Resources
- Latest Updates
- Most Popular
- Sitemap
- Search the site
- Privacy Policy
- Contact Us
0.0076

