
Nissan Versa (N17): Output speed sensor
Exploded View
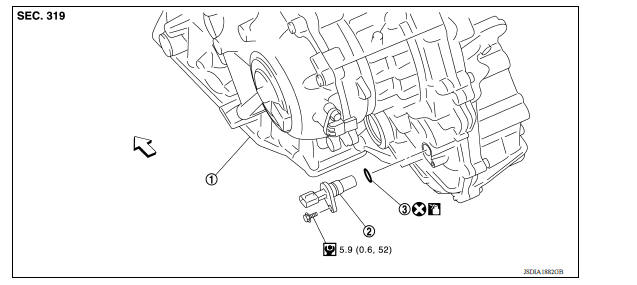
1. Transaxle assembly 2. Output speed sensor 3. O-ring
 Front
Front  Genuine
NISSAN CVT Fluid NS-3
Genuine
NISSAN CVT Fluid NS-3
Removal and Installation
REMOVAL
- Disconnect the harness connector from output speed sensor.
NOTE: Lift up the vehicle and perform the work from rear of the transaxle assembly.
- Remove the output speed sensor.
- Remove the O-ring from the output speed sensor.
INSTALLATION
Installation is in the reverse order of removal.
CAUTION:
- Do not reuse O-ring.
- Apply Genuine NISSAN CVT Fluid NS-3 to the O-ring.
Inspection and Adjustment
INSPECTION AFTER INSTALLATION
Check for CVT fluid leakage. Refer to TM "Inspection".
ADJUSTMENT AFTER INSTALLATION
Check the CVT fluid level. Refer to TM "Adjustment".
 Secondary speed sensor
Exploded View 1. Transaxle assembly 2. O-ring 3. Secondary speed sensor Front : Genuine NISSAN CVT Fluid NS-3 Removal and Installation REMOVAL Remove the front LH wheel and tire. Refer ...
Differential side oil seal
Exploded View 1. Transaxle assembly 2. Differential side oil seal (left side) 3. Differential side oil seal (right side) Front Genuine NISSAN CVT Fluid NS-3 Removal and Installation NOTE ...
Other materials:
Blower fan resistor
Exploded View
1. A/C unit assembly 2. Blower motor 3. Blower fan resistor
Removal and Installation
REMOVAL
Remove instrument panel assembly. Refer to IP "Removal and
Installation".
Disconnect harness connector from the blower fan resistor.
Remove screws and blower fan res ...
Nissan vehicle immobilizer system-NATS
NISSAN VEHICLE IMMOBILIZER SYSTEMNATS
: System Diagram
NISSAN VEHICLE IMMOBILIZER SYSTEMNATS
: System Description
INPUT/OUTPUT SIGNAL CHART
BCM
SYSTEM DESCRIPTION
NATS (N ...
Categories
- Manuals Home
- Nissan Versa Owners Manual
- Nissan Versa Service Manual
- Video Guides
- Questions & Answers
- External Resources
- Latest Updates
- Most Popular
- Sitemap
- Search the site
- Privacy Policy
- Contact Us

0.012