Nissan Versa (N17): P0643 sensor power supply
DTC Logic
DTC DETECTION LOGIC
| DTC No. | Trouble diagnosis name | DTC detecting condition | Possible cause |
|
P0643 |
Sensor power supply circuit short | ECM detects a voltage of power source for sensor is excessively low or high. |
|
DTC CONFIRMATION PROCEDURE
1.PRECONDITIONING
If DTC Confirmation Procedure has been previously conducted, always perform the following procedure before conducting the next test.
- Turn ignition switch OFF and wait at least 10 seconds.
- Turn ignition switch ON.
- Turn ignition switch OFF and wait at least 10 seconds.
TESTING CONDITION: Before performing the following procedure, confirm that battery voltage is more than 10 V at idle.
>> GO TO 2.
2.PERFORM DTC CONFIRMATION PROCEDURE
- Start engine and let it idle for 1 second.
- Check DTC.
Is DTC detected?
YES >> Go to EC, "Diagnosis Procedure".
NO >> INSPECTION END
Diagnosis Procedure
1.CHECK GROUND CONNECTION
- Turn ignition switch OFF.
- Check ground connection E15. Refer to Ground Inspection in GI, "Circuit Inspection".
Is the inspection result normal?
YES >> GO TO 2.
NO >> Repair or replace ground connection.
2.CHECK SENSOR POWER SUPPLY
- Turn ignition switch ON.
- Check the voltage between ECM harness connector and ground.
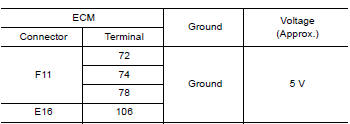
Is the inspection result normal?
YES >> GO TO 5.
NO >> GO TO 3.
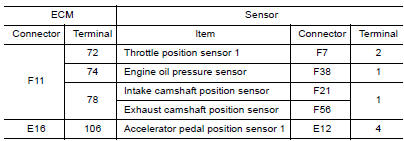
3.CHECK SENSOR POWER SUPPLY CIRCUIT
- Turn ignition switch OFF.
- Check harness for short to power and short to ground, between the
following terminals.
Is the inspection result normal?
YES >> GO TO 4.
NO >> Repair short to ground or short to power in harness or connectors.
4.CHECK COMPONENTS
Check the following.
- Throttle position sensor 1 (Refer to EC, "Component Inspection".)
- Engine oil pressure sensor (Refer to EC, "Component Inspection".)
- Intake camshaft position sensor (Refer to EC, "Component Inspection".)
- Exhaust camshaft position sensor (Refer to EC, "Component Inspection".)
- Accelerator pedal position sensor 1 (Refer to EC, "Component Inspection".)
Is the inspection result normal?
YES >> GO TO 5.
NO >> Replace malfunctioning component.
5.CHECK INTERMITTENT INCIDENT
Refer to GI, "Intermittent Incident".
>> INSPECTION END
 P0607 ECM
DTC Logic DTC DETECTION LOGIC DTC No. Trouble diagnosis (Trouble diagnosis content) DTC detecting condition Possible cause P0607 ECM (CAN communication bus) ...
P0850 PNP switch
Description For A/T models or CVT models, transmission range switch is turn ON when the selector lever is P or N. For M/T models, park/neutral position (PNP) range switch is ON when the selector ...
Other materials:
Maintenance schedules
To help ensure smooth, safe and economical
driving, NISSAN provides two maintenance
schedules that may be used, depending upon the
conditions in which you usually drive. These
schedules contain both distance and time intervals,
up to 120,000 miles
(192,000 km)/144 months. For most people, the
...
Differential side oil seal
Exploded View
1. Transaxle assembly 2. Differential side oil seal (left side) 3.
Differential side oil seal (right side)
Front Genuine
NISSAN CVT Fluid NS-3
Removal and Installation
NOTE:
When removing components such as hoses, tubes/lines, etc., cap or plug openings
to prevent flui ...
Categories
- Manuals Home
- Nissan Versa Owners Manual
- Nissan Versa Service Manual
- Video Guides
- Questions & Answers
- External Resources
- Latest Updates
- Most Popular
- Sitemap
- Search the site
- Privacy Policy
- Contact Us

0.0058