Nissan Versa (N17): Radiator
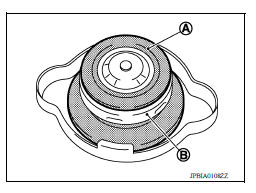
Radiator cap
RADIATOR CAP : Inspection
- Check valve seat (A) of radiator cap.
(B) : Metal plunger
- Replace the cap if the metal plunger cannot be seen around the edge of the black rubber gasket.
- Replace the cap if deposits of waxy residue or other foreign material are on the black rubber gasket or the metal retainer.
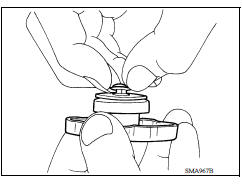
- Pull negativepressure valve to open it, and check that it closes completely when released.
- Check that there is no dirt or damage on the valve seat of radiator cap negativepressure valve.
- Make sure that the valve operates properly while opening and closing.
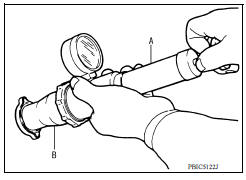
- Check radiator cap relief pressure using a suitable tool (A) and Tool (B).
Tool number (B) : EG17650301 (J33984A)
- When connecting the radiator cap to the Tool (B), apply water or coolant to the cap seal surface.
- Replace radiator cap if there is an abnormality in the negativepressure valve, or if the radiator cap does not perform within specifications.
CAUTION:
When installing radiator cap, thoroughly wipe out the radiator filler neck to remove any waxy residue or foreign material.
Radiator
RADIATOR : Inspection
Check radiator for mud or clogging. If necessary, clean radiator as follows.
CAUTION:
Be careful not to bend or damage radiator fins.
When the radiator is cleaned onvehicle, remove the surrounding parts in order to access the radiator core.
Then tape the harness and harness connectors to prevent water from entering.
- Spray water to the back side of the radiator core using a sidetoside motion from the top down.
- Stop spraying when debris no longer flows from radiator core.
- Blow air into the back side of radiator core using a sidetoside motion from the top down.
- Use compressed air lower than 490 kPa (5 kg/cm2, 71 psi) and keep distance more than 30 cm (11.81 in).
- Continue to blow air until no water sprays out.
- Check for coolant leaks. Repair as necessary.
RADIATOR
Exploded View
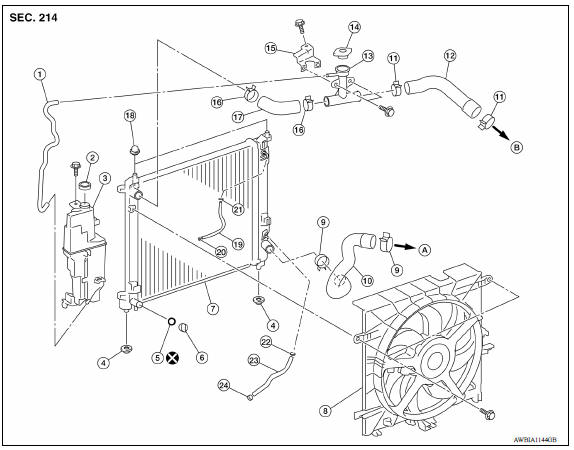
1. Reservoir tank hose 2. Reservoir tank cap 3. Reservoir tank 4. Mounting rubber (lower) 5. Oring 6. Drain plug 7. Radiator 8. Cooling fan assembly 9. Clamp 10. Radiator hose (lower) 11. Clamp 12. Radiator hose to water outlet (upper) 13. Radiator cap adapter 14. Radiator cap 15. Radiator cap adapter bracket 16. Clamp 17. Radiator hose (upper) to radiator 18. Mounting rubber (upper) 19. CVT cooler hose/ A/T fluid cooler hose 20. Clamp 21. Clamp 22. Clamp 23. CVT cooler hose/ A/T fluid cooler hose 24. Clamp A. To water inlet B. To water outlet
Removal and Installation
REMOVAL
WARNING:
Do not remove the radiator cap when the engine is hot. Serious burns could occur from highpressure engine coolant escaping from the radiator. Wrap a thick cloth around the radiator cap. Slowly turn it a quarter of a turn to release builtup pressure. Carefully remove radiator cap by turning it all the way.
NOTE:
When removing components such as hoses, tubes/lines, etc., cap or plug openings to prevent fluid from spilling.
1. Drain engine coolant.
CAUTION:
- Perform this step when the engine is cold.
- Do not spill engine coolant on drive belt.
- Remove air duct (inlet).
- Disconnect battery negative terminal.
- Loosen the following from the radiator core support (upper): a. Air bag harness b. Hood lock cable c. Radiator cap adapter d. Horn harness
- Remove radiator hose (lower).
- Remove radiator hose (upper) from water outlet.
- Disconnect harness connector from fan motor, and move harness aside.
- Disconnect reservoir tank hose, and remove reservoir tank.
- Remove radiator core support (upper).
- Remove radiator hose (upper) from radiator.
- Remove cooling fan assembly.
CAUTION:
Be careful not to damage or scratch the radiator.
12. Disconnect CVT cooler lines or A/T fluid cooler hose (if equipped).
13. Remove the radiator from bottom of the vehicle.
CAUTION:
When removing, do not damage or scratch radiator core or A/C condenser
INSTALLATION
Installation is in the reverse order of removal.
CAUTION:
Do not reuse Oring.
- Insert the radiator hose (1) all the way to the stopper (2) or by 33 mm (1.30 in) (hose without a stopper) as shown.
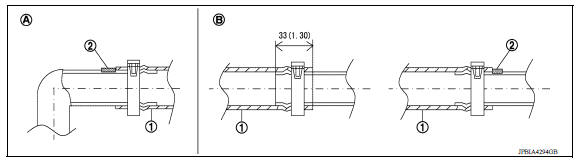
1. Radiator hose 2. Stopper A. Radiator side B. Engine side
- The correct orientation of the hose clamps are as shown.
| Radiator hose | Hose end | Paint mark | Position of hose clamp* |
| Radiator hose (upper) | Radiator side | Upper | A |
| Engine side | Upper | B | |
| Radiator hose (lower) | Radiator side | Lower | C |
| Engine side | Upper | D |
*: Refer to the illustrations for the specific position for each hose clamp tab.
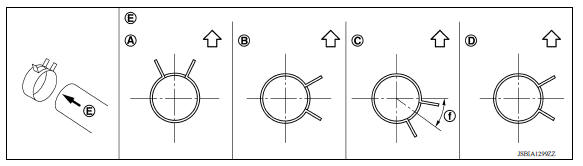
A. View A B. View B C. View C
D View D E. View E f. 45
 : Vehicle upper
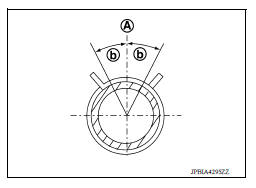
- The angle (b) created by the hose clamp pawl and the specified line (A) must be within +-30 as shown.
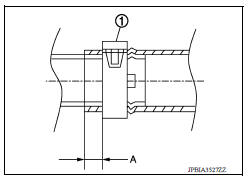
- To install hose clamps (1), check that the dimension (A) from the end of the hose clamp on the radiator hose to the hose clamp is within the reference value.
Dimension (A) : 3 - 7 mm (0.12 - 0.28 in)
CAUTION:
- When installing do not damage or scratch radiator core or A/C condenser.
- Replace water hose clamp if it is removed.
- Use only Genuine NISSAN bolts for the cooling fan assembly and strictly follow the tightening torque. Over tightening may damage the radiator.
INSPECTION AFTER INSTALLATION
- Check for engine coolant leaks.
- Start and warm up the engine. Visually inspect for coolant leaks. Repair as necessary.
 Engine coolant
Cooling fan
Exploded View 1. Fan shroud 2. Fan motor 3. Cooling fan A. Cooling fan nut L. Genuine NISSAN high strength locking sealant ...
Other materials:
Power steering fluid
Check the fluid level in the reservoir.
The fluid level should be checked when the fluid
is cold at fluid temperatures of 32 to 86ºF (0 to
30ºC). The fluid level can be checked with the
level gauge which is attached to the cap. To
check the fluid level, remove the cap. The fluid ...
Precautions
Precaution for Supplemental Restraint System
(SRS) "AIR BAG" and "SEAT BELT PRE-TENSIONER"
The Supplemental Restraint System such as "AIR BAG" and "SEAT BELT PRE-TENSIONER",
used along
with a front seat belt, helps to reduce the risk or severity of injury to the
driver and ...
Categories
- Manuals Home
- Nissan Versa Owners Manual
- Nissan Versa Service Manual
- Video Guides
- Questions & Answers
- External Resources
- Latest Updates
- Most Popular
- Sitemap
- Search the site
- Privacy Policy
- Contact Us

0.0063