
Nissan Versa (N17): Rear door speaker
Removal and Installation
REMOVAL
1. Remove the rear door finisher. Refer to INT "Removal and Installation".
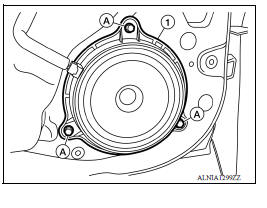
2. Remove the rear door speaker screws (A).
3. Disconnect the harness connector from rear door speaker (1) and remove.
INSTALLATION
Installation is in the reverse order of removal.
 Front door speaker
Removal and Installation REMOVAL 1. Remove the front door finisher. Refer to INT "Removal and Installation". 2. Remove the front door speaker screws (A). 3. Disconnect the harness conn ...
Roof antenna
Exploded View 1. Antenna mast 2. Antenna base Removal and Installation REMOVAL 1. Remove the headlining. Refer to INT "Removal and Installation". 2. Disconnect the antenna cable. 3 ...
Other materials:
Clutch master cylinder
Exploded View
1. Reservoir hose 2. Master cylinder
Removal and Installation
CAUTION:
Do not spill clutch fluid onto painted surfaces. If fluid spills,
wipe up immediately and wash the
affected area with water.
Do not disassemble clutch master cylinder.
NOTE:
When removing compo ...
O/D OFF indicator lamp
Component Function Check
1.CHECK O/D OFF INDICATOR LAMP FUNCTION
Check O/D OFF indicator lamp turns ON for approx. 2 seconds when ignition
switch turns ON.
Is the inspection results normal?
YES >> INSPECTION END
NO >> Go to TM "Diagnosis Procedure".
Diagnosis Procedur ...
Categories
- Manuals Home
- Nissan Versa Owners Manual
- Nissan Versa Service Manual
- Video Guides
- Questions & Answers
- External Resources
- Latest Updates
- Most Popular
- Sitemap
- Search the site
- Privacy Policy
- Contact Us

0.008