Nissan Versa (N17): Rear power window switch
Removal and Installation
REMOVAL
1. Remove rear power window switch finisher (1) assembly using a suitable tool (A).
 Pawl
Pawl
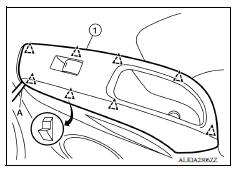
2. Disconnect the harness connector from the rear power window switch.
3. Separate rear power window switch (1) from rear power window switch finisher using a suitable tool.
CAUTION: Do not bend back the pawls on the switch finisher too far or breakage may occur.
INSTALLATION
Installation is in the reverse order of removal.
 Front power window switch
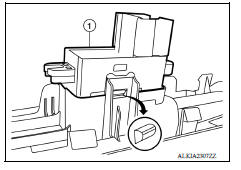
Removal and Installation REMOVAL 1. Remove front power window and door lock/unlock switch (RH) finisher assembly using a suitable tool (A). Pawl 2. Disconnect the harness connector from the f ...

Other materials:
Heater and Air Conditioner (manual)
WARNING
The air conditioner cooling function operates
only when the engine is running.
Do not leave children or adults who
would normally require the assistance
of others alone in your vehicle. Pets
should also not be left alone. They
could accidentally injure themselves or
others ...
Input shaft and gear
Exploded View
1. Input shaft front bearing 2. Input shaft 3. Snap ring
4. Input shaft rear bearing 5. Adapter plate 6. Bushing
7. 5th input gear 8. 5th-reverse baulk ring 9. Synchronizer lever
10. 5th-reverse synchronizer hub 11. 5th-reverse coupling sleeve 12. Lock washer
13. Retaining pi ...
Categories
- Manuals Home
- Nissan Versa Owners Manual
- Nissan Versa Service Manual
- Video Guides
- Questions & Answers
- External Resources
- Latest Updates
- Most Popular
- Sitemap
- Search the site
- Privacy Policy
- Contact Us

0.0053