Nissan Versa (N17): Front power window switch
Removal and Installation
REMOVAL
1. Remove front power window and door lock/unlock switch (RH) finisher assembly using a suitable tool (A).
 Pawl
Pawl
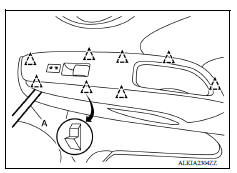
2. Disconnect the harness connector from the front power window and door lock/unlock switch (RH).
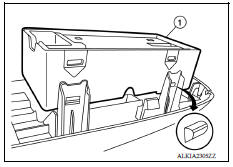
3. Separate front power window and door lock/unlock switch (1) from front power window and door lock/unlock switch (RH) finisher using a suitable tool.
CAUTION: Do not bend back the pawls on the switch finisher too far or breakage may occur.
INSTALLATION
Installation is in the reverse order of removal.
 Power window main switch
Removal and Installation REMOVAL 1. Remove main power window and door lock/unlock switch finisher assembly using a suitable tool (A). Pawl 2. Disconnect the harness connector from the main pow ...
Rear power window switch
Removal and Installation REMOVAL 1. Remove rear power window switch finisher (1) assembly using a suitable tool (A). Pawl 2. Disconnect the harness connector from the rear power window switch. ...
Other materials:
Brake and clutch (if so equipped) fluid
For additional information on brake fluid specification,
refer to "Recommended fluids/lubricants
and capacities" in the "Technical and consumer
information" section of this manual.
WARNING
Use only new fluid from a sealed container.
Old, inferior or contaminated
fluid may damage the br ...
Wheel alignment
Inspection
DESCRIPTION
CAUTION:
The adjustment mechanisms of camber and toe-in are not included.
If camber and toe-in is outside the standard, check front
suspension parts for wear and damage.
Replace suspect parts if a malfunction is detected.
Measure wheel alignment under unladen ...
Categories
- Manuals Home
- Nissan Versa Owners Manual
- Nissan Versa Service Manual
- Video Guides
- Questions & Answers
- External Resources
- Latest Updates
- Most Popular
- Sitemap
- Search the site
- Privacy Policy
- Contact Us

0.0049