
Nissan Versa (N17): Clutch fluid
Inspection
FLUID LEAKAGE
- Check clutch line for cracks, deterioration or other damage. Replace any damaged parts.
- Check for fluid leakage by fully depressing clutch pedal while engine is running.
CAUTION: If leaks occur around connections, reinstall the lines or replace damaged parts, if necessary.
FLUID LEVEL
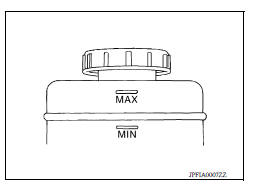
- Check that the fluid level in the reservoir tank is within the specified range, between the MAX and MIN lines as shown.
- Visually check for any clutch fluid leaks around the reservoir tank.
- Check the clutch system for any leaks if the fluid level is extremely low (lower than MIN).
Draining
CAUTION: Do not spill clutch fluid onto painted surfaces. If fluid spills, wipe up immediately and wash the affected area with water.
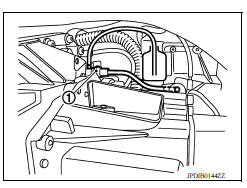
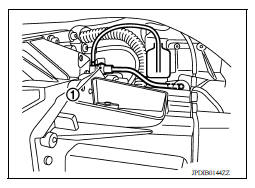
1. Connect a transparent vinyl hose to air bleeder of bleeding connector (1).
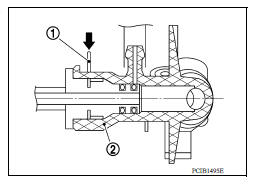
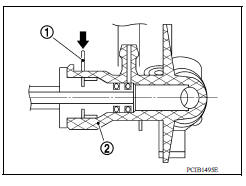
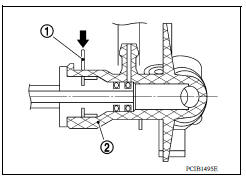
2. Press the lock pin (1) into the bleeding connector (2), and maintain the position.
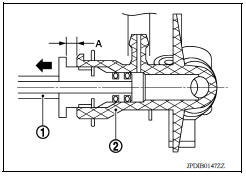
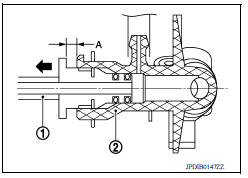
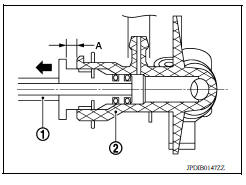
3. Slide clutch tube (1) for the specified
distance (A) in the direction
of the arrow (  ) as shown.
(2) : Bleeding connector
Dimension (A) : 5 mm (0.20 in)
CAUTION: Do not allow the clutch tube to disconnect from the bleeding connector.
4. Depress clutch pedal to gradually discharge clutch fluid.
CAUTION: Clutch tube is under hydraulic pressure; do not allow the clutch tube to disconnect from the bleeding connector.
Refilling
CAUTION: Do not spill clutch fluid onto painted surfaces. If fluid spills, wipe up immediately and wash the affected area with water.
1. Check that there is no foreign material in reservoir tank and then fill with new clutch fluid.
CAUTION: Do not reuse drained clutch fluid.
2. Connect a transparent vinyl hose to air bleeder of bleeding connector (1).
3. Press the lock pin (1) into the bleeding connector (2), and maintain the position.
4. Slide clutch tube (1) for the specified
distance (A) in the direction
of the arrow (  ) as shown.
(2) : Bleeding connector
Dimension (A) : 5 mm (0.20 in)
5. Slowly depress clutch pedal to the full stroke position and then release the pedal.
CAUTION: Clutch tube is under hydraulic pressure; do not allow the clutch tube to disconnect from the bleeding connector.
6. Repeat step 5 at intervals of 2 or 3 seconds until new clutch fluid is discharged.
CAUTION: Monitor clutch fluid level in reservoir tank so as not to empty the tank.
7. Return clutch tube and lock pin in their original positions while clutch pedal is depressed.
8. Perform the air bleeding. Refer to CL, "Air Bleeding".
Air Bleeding
CAUTION:
- Monitor clutch fluid level in reservoir tank so as not to empty the tank.
- Do not spill clutch fluid onto painted surfaces. If fluid spills, wipe up immediately and wash the affected area with water.
- Fill reservoir tank with new clutch fluid.
CAUTION: Do not reuse drained clutch fluid.
- Connect a transparent vinyl hose to air bleeder of bleeding connector (1).
- Depress and release the clutch pedal slowly and fully 15 times at an interval of 2 to 3 seconds and release the clutch pedal.
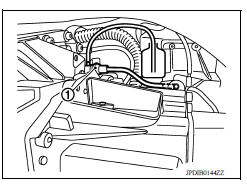
4. Press the lock pin (1) into the bleeding connector (2), and maintain the position.
CAUTION: Clutch tube is under hydraulic pressure; do not allow the clutch tube to disconnect from the bleeding connector.
5. Slide clutch tube (1) for the specified
distance (A) in the direction
of the arrow (  ) as shown and
immediately depress the clutch
pedal and hold it, to bleed the air from the system.
) as shown and
immediately depress the clutch
pedal and hold it, to bleed the air from the system.
(2) : Bleeding connector
Dimension (A) : 5 mm (0.20 in)
CAUTION: Clutch tube is under hydraulic pressure; do not allow the clutch tube to disconnect from the bleeding connector.
-
Return clutch tube and lock pin in their original positions.
-
Release clutch pedal and wait for 5 seconds.
-
Repeat steps 3 to 7 until no bubbles are observed in the clutch fluid.
-
Check that the fluid level in the reservoir tank is within the specified range after air bleeding. Refer to CL"Inspection".
 Clutch pedal
Inspection and Adjustment 1. Check to see if the master cylinder rod end moves freely. It should not be bound by the clutch pedal. a. If the rod end does not move freely, re ...
Clutch pedal
Exploded View 1. Clutch pedal 2. Pedal stopper rubber 3. Pedal pad 4. Clip 5. Clutch interlock switch Removal and Installation REMOVAL Remove the instrument lower panel LH. Refer to IP, ...
Other materials:
Kicking plate inner
KICKING PLATE INNER : Removal and Installation
FRONT KICKING PLATE
Removal
1. Release front kicking plate pawls using a
suitable tool (A) and
remove front kicking plate as shown.
CAUTION:
Apply protective tape (B) to the body as shown before
releasing the pawl ...
Center console assembly
Exploded View
1. Power socket 2. Center console assembly 3. Center console support
4. USB port and auxiliary jack
Disassembly and Assembly
DISASSEMBLY
Remove the center console assembly. Refer to IP "Removal and
Installation".
Remove center console support screws and cen ...
Categories
- Manuals Home
- Nissan Versa Owners Manual
- Nissan Versa Service Manual
- Video Guides
- Questions & Answers
- External Resources
- Latest Updates
- Most Popular
- Sitemap
- Search the site
- Privacy Policy
- Contact Us

0.0062