Nissan Versa (N17): TCM
Exploded View
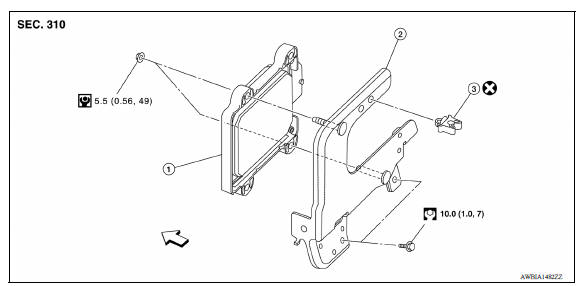
1. TCM 2. Bracket 3. Clip  Front
Front
Removal and Installation
CAUTION: When replacing TCM, note the "CVTF DETERIORATION DATE" value displayed on CONSULT "CONFORM CVTF DETERIORTN" in MAINTENANCE BOOKLET, before starting the operation.
NOTE: When replacing the TCM and transaxle assembly as a set, replace the transaxle assembly first and then replace the TCM. Refer to TM "Description".
REMOVAL
- Remove the battery. Refer to PG "Removal and Installation".
- Disconnect the harness connector from the TCM.
- Remove the TCM and bracket as an assembly.
- Remove the TCM from the bracket, if necessary.
INSTALLATION
Installation is in the reverse order of removal.
Adjustment
ADJUSTMENT AFTER INSTALLATION
Perform "ADDITIONAL SERVICE WHEN REPLACING TCM". Refer to TM "Description".
 Key interlock cable
Exploded View 1. CVT shift selector assembly 2. Key interlock cable A: Key cylinder B: Lock plate C: Clip Removal and Installation REMOVAL CAUTION: Always apply the parking brake before pe ...
Air breather hose
Removal and Installation REMOVAL Remove air duct (inlet). Refer to EM "Exploded View". Remove air breather hose from transaxle assembly. INSTALLATION Installation is in the reve ...
Other materials:
Description
Engine Cooling System
M/T models
CVT and A/T models
Engine Cooling System Schematic
M/T models
CVT and A/T models
OVERHEATING CAUSE ANALYSIS
Troubleshooting Chart
Symptom
Check items
Cooling system
parts
malfunction
Poor heat transfer
...
Cooling fan control
Cooling fan control : system diagram
Cooling fan control : system description
INPUT/OUTPUT SIGNAL CHART
Sensor
Input signal to ECM
ECM function
Actuator
Crankshaft position sensor (POS)
Camshaft position sensor (PHASE)
Engine speed*1
Piston position
Cool ...
Categories
- Manuals Home
- Nissan Versa Owners Manual
- Nissan Versa Service Manual
- Video Guides
- Questions & Answers
- External Resources
- Latest Updates
- Most Popular
- Sitemap
- Search the site
- Privacy Policy
- Contact Us

0.0048