Nissan Versa (N17): Vehicle identification
Vehicle identification number (VIN) plate
The vehicle identification number (VIN) plate is attached as shown. This number is the identification for your vehicle and is used in the vehicle registration.
Vehicle identification number (chassis number)
The vehicle identification number is located as shown.
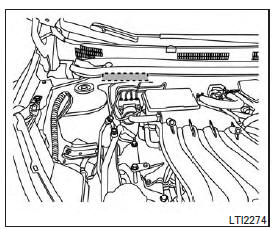
Engine serial number
HR16DE engine
The number is stamped on the engine as shown.
F.M.V.S.S. certification label
The Federal Motor Vehicle Safety Standard (F.M- .V.S.S.) certification label is affixed as shown.
This label contains valuable vehicle information, such as: Gross VehicleWeight Ratings (GVWR), Gross Axle Weight Rating (GAWR), month and year of manufacture, Vehicle Identification Number (VIN), etc. Review it carefully.
Emission control information label
The emission control information label is attached to the underside of the hood as shown.
Tire and loading information label
The cold tire pressure is shown on the Tire and Loading Information label. The label is located as shown.
Air conditioner specification label
The air conditioner specification label is affixed as shown.
 When traveling or registering in another country
When planning to drive your NISSAN vehicle in another country, you should first find out if the fuel available is suitable for your vehicle's engine. Using fuel with an octane rating that is too ...
Installing front license plate
Use the following steps to mount the front license plate: Before mounting the license plate, confirm that the following parts are enclosed in the plastic bag: License plate bracket Licen ...
Other materials:
Evaporative emission system
Inspection
1.CHECK EVAP CANISTER
Block port (B).
Blow air into port (A) and check that it flows freely out of port (C).
Release blocked port (B).
Apply vacuum pressure to port (B) and check that vacuum pressure
exists at the ports (A) and (C).
Block port (A) and (B).
Apply pressure ...
Removal and installation
ECM
Exploded View
1. ECM bracket 2. ECM
: Vehicle front
Removal and Installation
CAUTION: Perform ADDITIONAL SERVICE WHEN REPLACING ECM. Refer to
EC-122, "Work Procedure".
REMOVAL
Remove battery. Refer to PG, "Removal and Installation".
Remove IPDM E/R. Re ...
Categories
- Manuals Home
- Nissan Versa Owners Manual
- Nissan Versa Service Manual
- Video Guides
- Questions & Answers
- External Resources
- Latest Updates
- Most Popular
- Sitemap
- Search the site
- Privacy Policy
- Contact Us

0.0046