Nissan Versa (N17): Front power window switch
Removal and Installation
REMOVAL
1. Remove front power window and door lock/unlock switch (RH) finisher assembly using a suitable tool (A).
 Pawl
Pawl
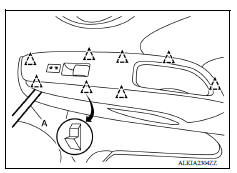
2. Disconnect the harness connector from the front power window and door lock/unlock switch (RH).
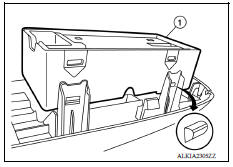
3. Separate front power window and door lock/unlock switch (1) from front power window and door lock/unlock switch (RH) finisher using a suitable tool.
CAUTION: Do not bend back the pawls on the switch finisher too far or breakage may occur.
INSTALLATION
Installation is in the reverse order of removal.
 Power window main switch
Removal and Installation REMOVAL 1. Remove main power window and door lock/unlock switch finisher assembly using a suitable tool (A). Pawl 2. Disconnect the harness connector from the main pow ...
Rear power window switch
Removal and Installation REMOVAL 1. Remove rear power window switch finisher (1) assembly using a suitable tool (A). Pawl 2. Disconnect the harness connector from the rear power window switch. ...
Other materials:
Power steering fluid
Check the fluid level in the reservoir.
The fluid level should be checked when the fluid
is cold at fluid temperatures of 32 to 86ºF (0 to
30ºC). The fluid level can be checked with the
level gauge which is attached to the cap. To
check the fluid level, remove the cap. The fluid ...
Engine assembly
Exploded View
1. Engine mounting (RH) stay 2. Engine mount (RH) stay 3. Engine mounting
insulator (RH)
4. Rear engine mounting bracket 5. Rear torque rod 6. Engine mounting bracket
(LH)
7. Engine mounting bracket (LH) 8. Engine mounting insulator (LH) 9. Mass damper
A. Front mark B. Tra ...
Categories
- Manuals Home
- Nissan Versa Owners Manual
- Nissan Versa Service Manual
- Video Guides
- Questions & Answers
- External Resources
- Latest Updates
- Most Popular
- Sitemap
- Search the site
- Privacy Policy
- Contact Us

0.0051