Nissan Versa (N17): Inside handle
INSIDE HANDLE : Removal and Installation
REMOVAL
1. Remove front door finisher. Refer to INT "Removal and Installation".
2. Remove upper side of sealing screen.
NOTE: Cut the butyl tape so that some parts of the butyl tape remain on the sealing screen, if the sealing screen is reused.
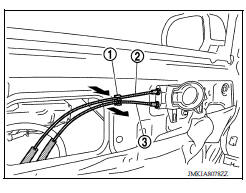
3. Release lock knob cable (2) and inside handle cable (3) from clip (1).
4. Remove inside handle bolt.
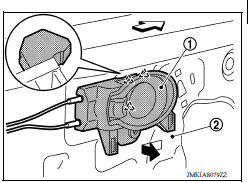
5. Release inside handle (1) from door panel (2) by sliding toward vehicle rear and separating.
 : Pawl
 : Front
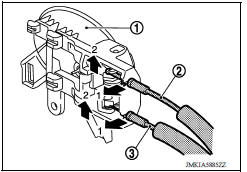
6. Disengage inside handle cable (3) and lock knob cable (2), and remove inside handle (1).
INSTALLATION
Installation is in the reverse order of removal.
CAUTION: After installation, check door open/close, lock/unlock operation.
 Door lock
DOOR LOCK : Removal and Installation REMOVAL Remove inside handle. Refer to DLK "INSIDE HANDLE : Removal and Installation". Remove outside handle. Refer to DLK "OUTSIDE HANDLE ...
Outside handle
OUTSIDE HANDLE : Removal and Installation REMOVAL 1. Fully close the front door glass. 2. Remove front door finisher. Refer to INT "Removal and Installation". 3. Remove sealing screen. ...
Other materials:
P0731 1GR Incorrect ratio
Description
This malfunction is detected when the A/T does not shift into 1GR position as
instructed by TCM. This is not
only caused by electrical malfunction (circuits open or shorted) but by
mechanical malfunction such as control
valve sticking, improper solenoid valve operation, etc.
DTC ...
Component parts Component parts Component parts
Component Parts Location
1. BCM (view with instrument panel removed)
2. ECM 3. IPDM E/R
4. Meter 5. Security indicator lamp 6. CVT shift selector (park position
switch) (view with center console removed)
7. Stop lamp switch 8. Push button ignition switch 9 NATS antenna amp.
10. Remot ...
Categories
- Manuals Home
- Nissan Versa Owners Manual
- Nissan Versa Service Manual
- Video Guides
- Questions & Answers
- External Resources
- Latest Updates
- Most Popular
- Sitemap
- Search the site
- Privacy Policy
- Contact Us

0.0075