Nissan Versa (N17): Audio unit
Removal and Installation
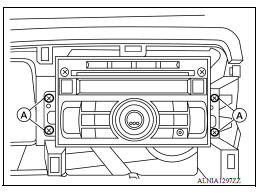
REMOVAL
1. Remove cluster lid C. Refer to IP "Removal and Installation".
2. Remove the audio unit screws (A).
3. Pull the audio unit out.
4. Disconnect the harness connectors from the audio unit and remove.
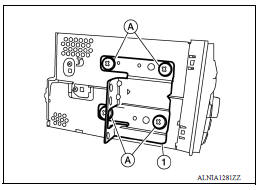
5. Remove the audio unit bracket screws (A) and the audio unit bracket (1) from each side of the audio unit (if necessary).
INSTALLATION
Installation is in the reverse order of removal.
 Normal operating condition
Description RELATED TO NOISE The majority of the audio concerns are the result of outside causes (bad CD, electromagnetic interference, etc.). The following noise results from variations in ...
Front door speaker
Removal and Installation REMOVAL 1. Remove the front door finisher. Refer to INT "Removal and Installation". 2. Remove the front door speaker screws (A). 3. Disconnect the harness conn ...
Other materials:
Owner's Manual/Service Manual order information
Genuine NISSAN Service Manuals for this model
year and prior can be purchased. A Genuine
NISSAN Service Manual is the best source of
service and repair information for your vehicle.
This manual is the same one used by the factorytrained
technicians working at NISSAN dealerships.
Genuine NI ...
Id registration procedure
Description
This procedure must be performed after replacing wheels, transmitters or the
BCM, or rotating wheels.
Work Procedure
NOTE:
The Signal Tech II Tool (J-50190) can be used to perform the following
functions. Refer to the Signal Tech II
User Guide for additional information.
Ac ...
Categories
- Manuals Home
- Nissan Versa Owners Manual
- Nissan Versa Service Manual
- Video Guides
- Questions & Answers
- External Resources
- Latest Updates
- Most Popular
- Sitemap
- Search the site
- Privacy Policy
- Contact Us

0.0053