
Nissan Versa (N17): Diagnosis and repair workflow
Trouble Diagnosis Flow Chart
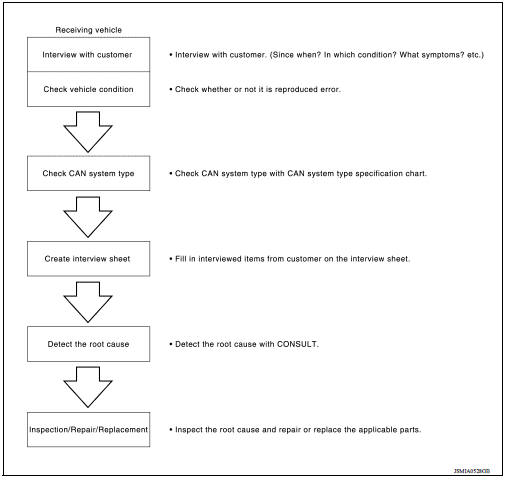
Trouble Diagnosis Procedure
INTERVIEW WITH CUSTOMER
Interview with the customer is important to detect the root cause of CAN communication system errors and to understand vehicle condition and symptoms for proper trouble diagnosis.
Points in interview
- What: Parts name, system name
- When: Date, Frequency
- Where: Road condition, Place
- In what condition: Driving condition/environment
- Result: Symptom
Notes for checking error symptoms:
- Check normal units as well as error symptoms.
- Example: Circuit between ECM and the combination meter is judged normal if the customer indicates tachometer functions normally.
- When a CAN communication system error is present, multiple control units may malfunction or go into failsafe mode.
- Indication of the combination meter is important to detect the root cause because it is the most obvious to the customer, and it performs CAN communication with many units.
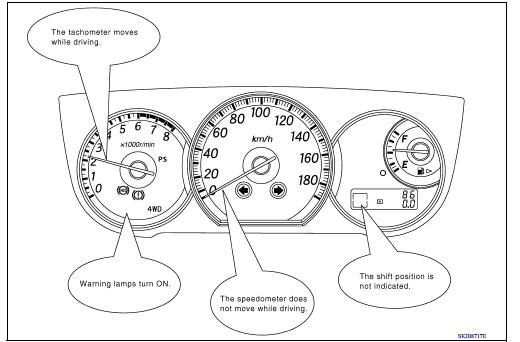
INSPECTION OF VEHICLE CONDITION
Check whether the symptom is reproduced or not.
NOTE: Do not turn the ignition switch OFF or disconnect the battery cable while reproducing the error. The error may temporarily correct itself, making it difficult to determine the root cause.
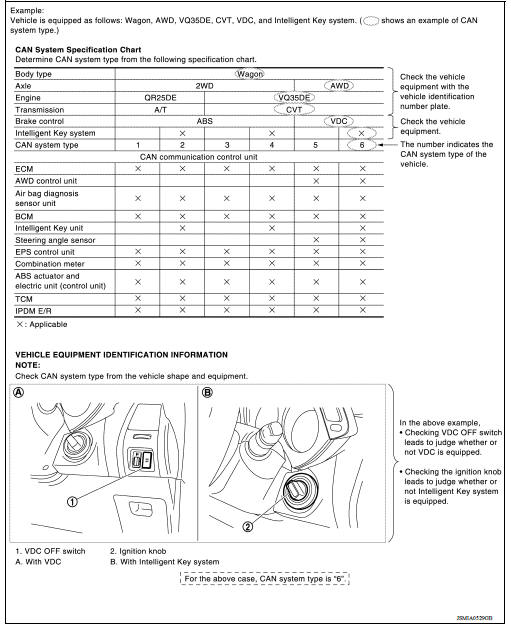
CHECK OF CAN SYSTEM TYPE (HOW TO USE CAN SYSTEM TYPE SPECIFICATION CHART)
Determine CAN system type based on vehicle equipment.
NOTE:
- This chart is used if CONSULT does not automatically recognize CAN system type.
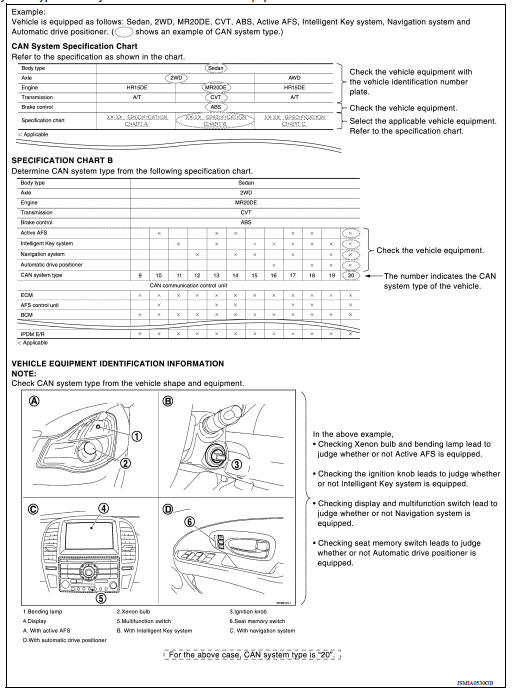
- There are two styles for CAN system type specification charts. Depending on the number of available system types, either style A or style B may be used.
CAN System Type Specification Chart (Style A)
NOTE: CAN system type is easily checked with the vehicle equipment identification information shown in the chart.
CAN System Type Specification Chart (Style B)
NOTE: CAN system type is easily checked with the vehicle equipment identification information shown in the chart.
CREATE INTERVIEW SHEET
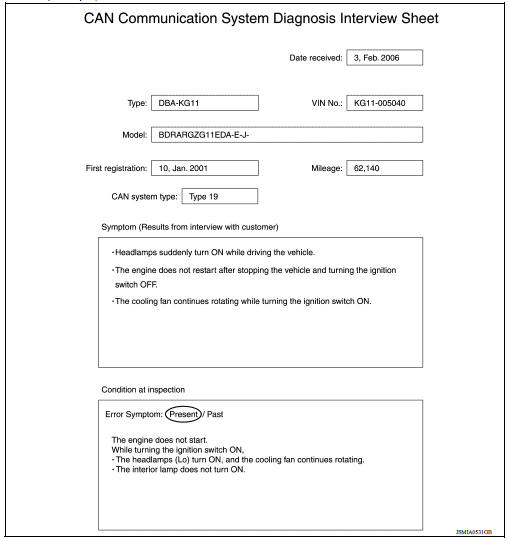
Fill out the symptom described by the customer, vehicle condition, and CAN system type on the interview sheet.
Interview Sheet (Example)
DETECT THE ROOT CAUSE
CAN diagnosis function of CONSULT detects the root cause.
HOW TO USE THIS MANUAL
HOW TO USE THIS SECTION
Information
- "CAN" of LAN Section describes information peculiar to a vehicle and inspection procedures.
- For trouble diagnosis procedure, refer to LAN "Trouble Diagnosis Flow Chart" of "CAN FUNDAMENTAL".
Abbreviation List
Unit name abbreviations in CONSULT CAN diagnosis and in this section are as
per the following list.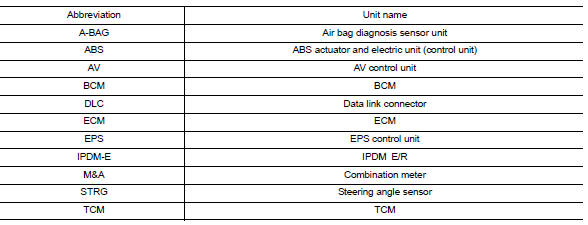
 Trouble diagnosis
Component Description ...

Other materials:
Crash zone sensor
Exploded View
1. Crash zone sensor 2. Bracket A. Nut
Front
Removal and Installation
REMOVAL
WARNING:
Before servicing, turn ignition switch OFF, disconnect battery
negative terminal and wait three minutes
or more.
Do not use the air tools or electric tools for servicing.
CAU ...
Floor trim
Exploded View
1. Harness clip A 2. Harness clip B 3. Floor carpet
4. Carpet hook 5. Front floor spacer (RH) 6. Front floor spacer (LH)
7. Rear floor spacer (LH) 8. Rear floor spacer (RH)
Front
Clip
Removal and Installation
REMOVAL
Remove front seat assemblies (LH/RH). Refer to SE &q ...
Categories
- Manuals Home
- Nissan Versa Owners Manual
- Nissan Versa Service Manual
- Video Guides
- Questions & Answers
- External Resources
- Latest Updates
- Most Popular
- Sitemap
- Search the site
- Privacy Policy
- Contact Us

0.0093