
Nissan Versa (N17): Intelligent key
Component Function Check
NOTE: The Signal Tech II Tool (J-50190) can be used to perform the following functions. Refer to the Signal Tech II User Guide for additional information.
- Check Intelligent Key relative signal strength.
- Confirm vehicle Intelligent Key antenna signal strength.
1.CHECK FUNCTION
- Select "INTELLIGENT KEY" of "BCM" using CONSULT.
- Select "RKE OPE COUN1" in "DATA MONITOR" mode.
- Check that the function operates normally according to the following
conditions.

Is the inspection result normal? YES >> Intelligent Key is OK.
NO >> Refer to DLK-93, "Diagnosis Procedure".
Diagnosis Procedure
NOTE: The Signal Tech II Tool (J-50190) can be used to perform the following functions. Refer to the Signal Tech II User Guide for additional information.
- Check Intelligent Key relative signal strength.
- Confirm vehicle Intelligent Key antenna signal strength.
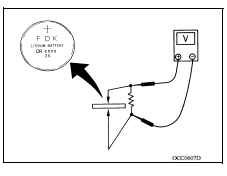
1.CHECK INTELLIGENT KEY BATTERY
Check by connecting a resistance (approximately 300Ω) so that the current value becomes about 10 mA. Refer to DLK "Removal and Installation".
Standard : Approx. 2.5 - 3.0V
Is the measurement value within the specification?
YES >> Replace Intelligent Key.
NO >> Replace Intelligent Key battery.
 Hazard function
Component Function Check 1.CHECK FUNCTION Select INTELLIGENT KEY of BCM using CONSULT. Select FLASHER in ACTIVE TEST mode. Touch LH or RH to check that it works normally. Is the inspecti ...
Key warning lamp
Component Function Check 1.CHECK FUNCTION Select INTELLIGENT KEY of BCM using CONSULT. Select INDICATOR in ACTIVE TEST mode. Touch KEY IND or KEY ON to check that it works normally. Is the ...
Other materials:
Air cleaner filter
Exploded View
1. Clamp 2. PCV hose 3. Clamp
4. Mount rubber 5. Air duct (inlet) 6. Air cleaner body
7. Grommet 8. Air cleaner filter 9. Air cleaner cover
10. Mass air flow sensor 11. Air duct 12. Clamp
Removal and Installation
REMOVAL
1. Unhook clips (A) and pull the air cleaner cover u ...
CVT Fluid cooler system
Cleaning
Whenever an automatic transaxle is repaired, overhauled, or replaced, the CVT
fluid cooler mounted in the
radiator must be inspected and cleaned.
Metal debris and friction material, if present, can be trapped or be deposited
in the CVT fluid cooler. This
debris can contaminate th ...
Categories
- Manuals Home
- Nissan Versa Owners Manual
- Nissan Versa Service Manual
- Video Guides
- Questions & Answers
- External Resources
- Latest Updates
- Most Popular
- Sitemap
- Search the site
- Privacy Policy
- Contact Us

0.0474