Nissan Versa (N17): Door lock
DOOR LOCK : Removal and Installation
REMOVAL
1. Remove inside handle. Refer to DLK "INSIDE HANDLE : Removal and Installation".
2. Remove outside handle. Refer to DLK "OUTSIDE HANDLE : Removal and Installation".
3. Remove bolt (A) from the front door glass channel rear (1).
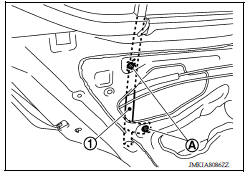
4. Disconnect the harness connector from door lock actuator.
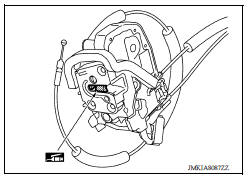
5. Remove door lock assembly bolts and door lock assembly.
INSTALLATION
Installation is in the reverse order of removal.
CAUTION:
- Do not reuse door lock assembly bolt. Always replace it with a new one when it is removed.
- After installation, check door open/close, lock/unlock operation.
- Check door lock cable is properly engaged with outside handle bracket.
- Check door lock assembly for poor lubrication. Apply a suitable multi-purpose grease to door lock if necessary.
 Outside handle
OUTSIDE HANDLE : Removal and Installation REMOVAL 1. Fully close the front door glass. 2. Remove front door finisher. Refer to INT "Removal and Installation". 3. Remove sealing screen. ...
Inside handle
INSIDE HANDLE : Removal and Installation REMOVAL 1. Remove rear door finisher. Refer to INT "Removal and Installation". 2. Remove upper side of sealing screen. NOTE: Cut the butyl tape ...
Other materials:
Windows
Power windows (if so equipped)
WARNING
Make sure that all passengers have
their hands, etc. inside the vehicle while
it is in motion and before closing the
windows. Use the window lock switch to
prevent unexpected use of the power
windows
To help avoid risk of injury or death
thr ...
Description
Engine Cooling System
M/T models
CVT and A/T models
Engine Cooling System Schematic
M/T models
CVT and A/T models
OVERHEATING CAUSE ANALYSIS
Troubleshooting Chart
Symptom
Check items
Cooling system
parts
malfunction
Poor heat transfer
...
Categories
- Manuals Home
- Nissan Versa Owners Manual
- Nissan Versa Service Manual
- Video Guides
- Questions & Answers
- External Resources
- Latest Updates
- Most Popular
- Sitemap
- Search the site
- Privacy Policy
- Contact Us

0.0052