Nissan Versa (N17): Interior lights
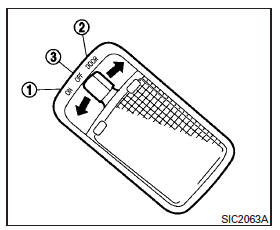
The interior light has a three-position switch and operates regardless of ignition switch position.
When the switch is in the ON position 1 , the interior lights illuminate, regardless of door position.
The lights will go off after a period of time unless the ignition switch is placed in the ACC or ON position.
When the switch is in the DOOR position 2 , the interior lights will stay on for a period of time when:
- The doors are unlocked by the key fob (if so equipped), a key or the power door lock switch (if so equipped) while all doors are closed and the ignition switch is placed in the OFF position.
- The driver's door is opened and then closed while the key is removed from the ignition switch.
- The key is removed from the ignition switch while all doors are closed.
The lights will turn off while the timer is activated when:
- The driver's door is locked by the key fob (if so equipped), a key, or the power door lock switch (if so equipped).
- The ignition switch is placed in the ON position.
When the switch is in the OFF position 3 , the interior lights do not illuminate, regardless of door position.
The lights will turn off automatically after a period of time while doors are open to prevent the battery from becoming discharged.
CAUTION
Do not use for extended periods of time with the engine stopped. This could result in a discharged battery.
Map light (if so equipped)
The map light has a three-position switch and operates regardless of ignition switch position.
When the switch is in the ON position 3 , the map light illuminates, regardless of door position.
The light will go off after a period of time unless the ignition switch is placed in the ACC or ON position.
When the switch is in the DOOR position 2 , the map light will stay on for a period of time when:
- The doors are unlocked by the key fob (if so equipped), a key or the power door lock switch while all doors are closed and the ignition switch is placed in the OFF position.
- The driver's door is opened and then closed while the key is removed from the ignition switch.
- The key is removed from the ignition switch while all doors are closed.
The light will turn off while the timer is activated when:
- The driver's door is locked by the key fob (if so equipped), a key, or the power door lock switch.
- The ignition switch is placed in the ON position.
When the switch is in the OFF position 1 , the map light does not illuminate, regardless of door position.
The light will turn off automatically after a period of time while doors are open to prevent the battery from becoming discharged.
CAUTION
Do not use for extended periods of time with the engine stopped. This could result in a discharged battery.
Trunk light
The light illuminates when the trunk lid is opened.
When the trunk lid is closed, the light goes off.
For additional information, refer to "Exterior and interior lights" in the "Do-it-yourself" section of this manual.
 Windows
Power windows (if so equipped) WARNING Make sure that all passengers have their hands, etc. inside the vehicle while it is in motion and before closing the windows. Use the window lock swi ...
Keys
Type A (if so equipped) 1. Master key 2. Valet key 3. Key number plate A key number plate is supplied with your keys. Record the key number and keep it in a safe place (such as your wallet ...
Other materials:
Vehicle Dynamic Control (VDC) off switch
The vehicle should be driven with the VDC system
on for most driving conditions.
If the vehicle is stuck in mud or snow, the VDC
system reduces the engine output to reduce
wheel spin. The engine speed will be reduced
even if the accelerator is depressed to the floor. If
maximum engine po ...
P2858 Clutch B pressure
DTC Logic
DTC DETECTION LOGIC
DTC
Trouble diagnosis name
DTC detection condition
Possible causes
P2858
Clutch B pressure engagement
performance
The auxiliary gearbox gear ratio is 2.232 or
more for the auxiliary gearbox 2GR ratio continuously
for 5 seconds ...
Categories
- Manuals Home
- Nissan Versa Owners Manual
- Nissan Versa Service Manual
- Video Guides
- Questions & Answers
- External Resources
- Latest Updates
- Most Popular
- Sitemap
- Search the site
- Privacy Policy
- Contact Us

0.0053