Nissan Versa (N17): Radiator core support lower
RADIATOR CORE SUPPORT LOWER : Removal and Installation
Removal
1. Remove under cover. Refer to EXT "Removal and Installation".
2. Remove radiator upper seal clips.
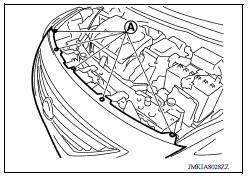
3. Remove front bumper fascia upper side clips (A).
4. Remove fender protector (LH/RH) clips from radiator core support lower. Refer to EXT "Exploded View".
5. Remove lower clips of radiator side seal (LH/RH).
6. Remove lower clips of condenser side seal.
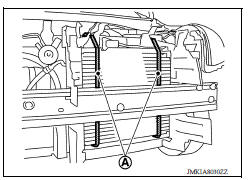
7. Use suitable tools (A) to suspend components and to prevent them from falling.
CAUTION: Use care to avoid damage to radiator and condenser.
8. Remove radiator core support lower bolts and radiator core support lower.
Installation
Installation is in the reverse order of removal.
FRONT FENDER
Exploded View
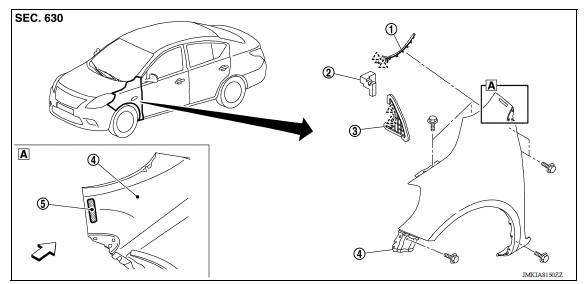
1. Front fender cover 2. Front fender seal 3. Front fender upper insulator
4. Front fender 5. Front fender stiffener  Front
Front
 Pawl
Pawl
 Radiator core support upper
RADIATOR CORE SUPPORT UPPER : Removal and Installation RADIATOR CORE SUPPORT UPPER Removal 1. Remove ground harness bolt (A). 2. Remove horn. Refer to HRN "Removal and Installation" ...
Front fender
FRONT FENDER : Removal and Installation CAUTION: Use a shop cloths to protect the body from being damaged during removal and installation. REMOVAL Remove fender protector. Refer to EXT " ...
Other materials:
Sun visors
1. To block glare from the front, swing down
the sun visor 1 .
2. To block glare from the side, remove the sun
visor from the center mount and swing the
visor to the side 2 .
3. Slide the extension 3 sun visor in or out as
needed.
CAUTION
Do not store the sun visor before returning
...
Spark plugs
Replacing spark plugs
Platinum-tipped spark plugs
It is not necessary to replace platinum-tipped A
spark plugs as frequently as conventional type
spark plugs because they last much longer. Follow
the maintenance log shown in the Maintenance
and Schedules section of this manual. Do
not ser ...
Categories
- Manuals Home
- Nissan Versa Owners Manual
- Nissan Versa Service Manual
- Video Guides
- Questions & Answers
- External Resources
- Latest Updates
- Most Popular
- Sitemap
- Search the site
- Privacy Policy
- Contact Us

0.0061