Nissan Versa (N17): Radiator core support upper
RADIATOR CORE SUPPORT UPPER : Removal and Installation
RADIATOR CORE SUPPORT UPPER
Removal
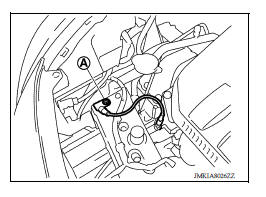
1. Remove ground harness bolt (A).
2. Remove horn. Refer to HRN "Removal and Installation".
3. Remove hood lock assembly and hood lock control cable assembly clip. Refer to DLK "HOOD LOCK : Removal and Installation".
4. Remove crash zone sensor. Refer to SR "Removal and Installation".
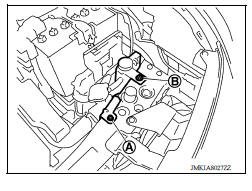
5. Remove radiator cap adapter bracket bolt (A) and radiator reservoir tank bolt (B).
6. Remove radiator upper seal clips.
7. Remove upper clips of radiator side seal (LH/RH).
8. Disconnect all harness clips.
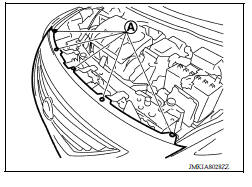
9. Remove front bumper fascia upper side clips (A).
10. Remove radiator core support upper bolts.
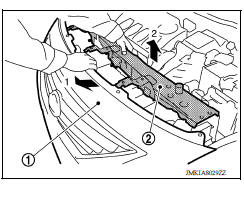
11. Pull back on upper part of front bumper fascia (1) and then remove radiator core support upper (2) by pulling upward.
Installation
Installation is in the reverse order of removal.
 Hood hinge
HOOD HINGE : Removal and Installation REMOVAL Remove hood assembly. Refer to DLK "HOOD ASSEMBLY : Removal and Installation". Remove hood support rod and grommet. Refer to DLK" ...
Radiator core support lower
RADIATOR CORE SUPPORT LOWER : Removal and Installation Removal 1. Remove under cover. Refer to EXT "Removal and Installation". 2. Remove radiator upper seal clips. 3. Remove front bumpe ...
Other materials:
Jump starting
To start your engine with a booster battery, the
instructions and precautions below must be followed.
WARNING
If done incorrectly, jump starting can
lead to a battery explosion, resulting in
severe injury or death. It could also
damage your vehicle.
Explosive hydrogen gas is always pre ...
SRS Air bag system
SRS AIR BAG SYSTEM : System Diagram
SRS AIR BAG SYSTEM : System Description
The air bag deploys if the air bag diagnosis sensor unit is activated
while the ignition switch is in the ON or
START position.
The collision modes for which supplemental restraint systems are
activated a ...
Categories
- Manuals Home
- Nissan Versa Owners Manual
- Nissan Versa Service Manual
- Video Guides
- Questions & Answers
- External Resources
- Latest Updates
- Most Popular
- Sitemap
- Search the site
- Privacy Policy
- Contact Us

0.0056