Nissan Versa (N17): Trunk rear plate
TRUNK REAR PLATE : Removal and Installation
REMOVAL
- Fully open trunk lid.
- Remove trunk floor carpet.
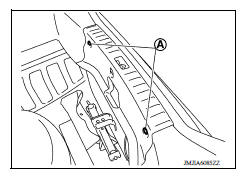
- Remove trunk rear plate clips (A).
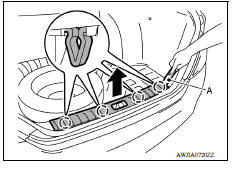
4. Release trunk rear plate pawls using a suitable tool (A) and remove trunk rear plate as shown.
INSTALLATION
Installation is in the reverse order of removal.
CAUTION: When installing trunk rear plate, make sure that clips are securely pressed into body holes.
TRUNK FRONT FINISHER
TRUNK FRONT FINISHER : Removal and Installation
REMOVAL
- Fully open trunk lid.
- Remove trunk floor carpet.
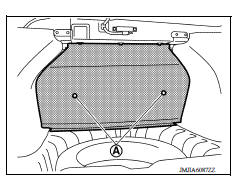
- Remove trunk front finisher clips (A) and trunk front finisher.
INSTALLATION
Installation is in the reverse order of removal.
CAUTION: When installing trunk front finisher, make sure that clips are securely pressed into body holes.
TRUNK SIDE FINISHER
TRUNK SIDE FINISHER : Removal and Installation
REMOVAL
- Remove trunk rear plate. Refer to INT "TRUNK REAR PLATE : Removal and Installation".
- Remove trunk front finisher. Refer to INT "TRUNK FRONT FINISHER : Removal and Installation".
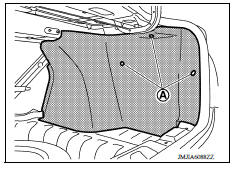
- Remove trunk side finisher clips (A) and trunk side finisher.
INSTALLATION
Installation is in the reverse order of removal.
CAUTION: Make sure the rear end of trunk side finisher is positioned behind the trunk weatherstrip.
 Headlining
Exploded View 1. Headlining assembly 2. Sun visor assembly (RH) 3. Sun visor assembly (RH) 4. Map lamp (if equipped) 5. Sun visor holder (LH) 6. Sun visor assembly (LH) 7. Microphone finisher ...
Trunk lid trim
Exploded View 1. Trunk lid assembly 2. Trunk lid finisher Removal and Installation REMOVAL Fully open trunk lid. Remove emergency release handle. Refer to DLK "EMERGENCY LEVER : Re ...
Other materials:
Front drive shaft
Exploded View
1. Drive shaft 2. Cotter pin A. Apply Molykote M77
Removal and Installation
REMOVAL
Remove the wheel and tire assembly using power tool. Refer to WT
"Adjustment".
Remove wheel sensor and sensor harness. Refer to BRC "FRONT WHEEL SENSOR
: Removal and
...
VDC/TCS/ABS
Symptom Table
If ABS warning lamp and SLIP indicator lamp turn ON, perform self-diagnosis.
NOTE:
The ABS does not operate when the speed is 10 km/h (6 MPH) or less.
Under the following conditions, ABS is activated and vibration is
felt when brake pedal is lightly depressed (just place ...
Categories
- Manuals Home
- Nissan Versa Owners Manual
- Nissan Versa Service Manual
- Video Guides
- Questions & Answers
- External Resources
- Latest Updates
- Most Popular
- Sitemap
- Search the site
- Privacy Policy
- Contact Us

0.0049