Nissan Versa (N17): Audio unit
Removal and Installation
REMOVAL
1. Remove cluster lid C. Refer to IP "Removal and Installation".
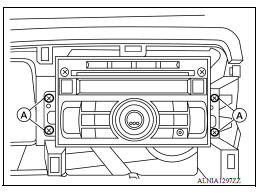
2. Remove the audio unit screws (A).
3. Pull the audio unit out.
4. Disconnect the harness connectors from the audio unit and remove.
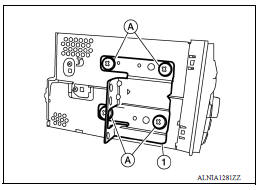
5. Remove the audio unit bracket screws (A) and the audio unit bracket (1) from each side of the audio unit (if necessary).
INSTALLATION
Installation is in the reverse order of removal.
 Normal operating condition
Description RELATED TO NOISE The majority of the audio concerns are the result of outside causes (bad CD, electromagnetic interference, etc.). The following noise results from variations in ...
Front door speaker
Removal and Installation REMOVAL 1. Remove the front door finisher. Refer to INT "Removal and Installation". 2. Remove the front door speaker screws (A). 3. Disconnect the harness conn ...
Other materials:
Line pressure test
Work Procedure
INSPECTION
Inspect the amount of engine oil. Replenish the engine oil if necessary.
Refer to LU, "Inspection".
Drive for about 10 minutes to warm up the vehicle so that the A/T fluid
temperature is to 50 to 80C (122
to 176F).
Inspect the amount of ATF. Rep ...
Brake drum
BRAKE DRUM : Inspection and Adjustment
INSPECTION
Appearance
Check surface of brake drum for uneven wear, cracks and serious damage.
Replace it if necessary. Refer to
BR "Removal and Installation".
Brake Drum Inner Diameter
Check inner diameter (B) of the brake drum.
(B) : Refe ...
Categories
- Manuals Home
- Nissan Versa Owners Manual
- Nissan Versa Service Manual
- Video Guides
- Questions & Answers
- External Resources
- Latest Updates
- Most Popular
- Sitemap
- Search the site
- Privacy Policy
- Contact Us

0.0059