
Nissan Versa (N17): Front door speaker
Removal and Installation
REMOVAL
1. Remove the front door finisher. Refer to INT "Removal and Installation".
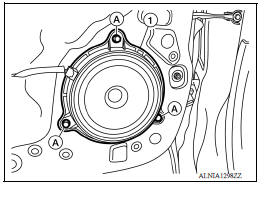
2. Remove the front door speaker screws (A).
3. Disconnect the harness connector from front door speaker (1) and remove.
INSTALLATION
Installation is in the reverse order of removal.
 Audio unit
Removal and Installation REMOVAL 1. Remove cluster lid C. Refer to IP "Removal and Installation". 2. Remove the audio unit screws (A). 3. Pull the audio unit out. 4. Disconnect the ha ...
Rear door speaker
Removal and Installation REMOVAL 1. Remove the rear door finisher. Refer to INT "Removal and Installation". 2. Remove the rear door speaker screws (A). 3. Disconnect the harness connec ...
Other materials:
Cleaning exterior
In order to maintain the appearance of your vehicle,
it is important to take proper care of it.
To protect the paint surfaces, please wash your
vehicle as soon as you can:
After a rainfall to prevent possible damage
from acid rain.
After driving on coastal roads.
When contaminants suc ...
Air cleaner filter
Exploded View
1. Clamp 2. PCV hose 3. Clamp
4. Mount rubber 5. Air duct (inlet) 6. Air cleaner body
7. Grommet 8. Air cleaner filter 9. Air cleaner cover
10. Mass air flow sensor 11. Air duct 12. Clamp
Removal and Installation
REMOVAL
1. Unhook clips (A) and pull the air cleaner cover u ...
Categories
- Manuals Home
- Nissan Versa Owners Manual
- Nissan Versa Service Manual
- Video Guides
- Questions & Answers
- External Resources
- Latest Updates
- Most Popular
- Sitemap
- Search the site
- Privacy Policy
- Contact Us

0.0052