Nissan Versa (N17): P0443 EVAP canister purge volume control solenoid valve
DTC Logic
DTC DETECTION LOGIC
| DTC No. | Trouble diagnosis name | DTC detecting condition | Possible cause | |
| P0443 | PURG VOLUME CONT/V (EVAP canister purge volume control solenoid valve) | A | The canister purge flow is detected during the vehicle is stopped while the engine is running, even when EVAP canister purge volume control solenoid valve is completely closed. |
|
| B | The canister purge flow is detected during the specified driving conditions, even when EVAP canister purge volume control solenoid valve is completely closed. | |||
DTC CONFIRMATION PROCEDURE
1.PRECONDITIONING
If DTC Confirmation Procedure has been previously conducted, always perform the following procedure before conducting the next test.
- Turn ignition switch OFF and wait at least 10 seconds.
- Turn ignition switch ON.
- Turn ignition switch OFF and wait at least 10 seconds.
TESTING CONDITION:
- Perform DTC CONFIRMATION PROCEDURE when the fuel is between 1/4 and 3/4 full, and vehicle is placed on flat level surface.
- Always perform test at a temperature of 5 to 60C (41 to 140F).
- Cool the vehicle so that engine coolant temperature becomes same level as ambient temperature.
Do you have CONSULT
YES >> GO TO 2.
NO >> GO TO 4.
2.PERFORM DTC CONFIRMATION PROCEDURE A
With CONSULT
- Turn ignition switch ON.
- Select "DATA MONITOR" mode of "ENGINE" using CONSULT.
- Check that the following condition are met.
FUEL T/TMP SE: 0 35C (32 95F)
- Start engine and wait at least 60 seconds.
- Check 1st trip DTC.
Is 1st trip DTC detected?
YES >> Proceed to EC, "Diagnosis Procedure".
NO >> GO TO 3.
3.PERFORM DTC CONFIRMATION PROCEDURE B
With CONSULT
- Start engine and warm it up to normal operating temperature.
- Turn ignition switch OFF and wait at least 10 seconds.
- Turn ignition switch ON.
- Select "PURG VOL CN/V P1444" of "EVAPORATIVE SYSTEM" in "DTC WORK SUPPORT" mode of "ENGINE" using CONSULT.
- Touch "START".
- Start engine and let it idle until "TESTING" on CONSULT changes to "COMPLETED". (It will take approximately 10 seconds.) If "TESTING" is not displayed after 5 minutes, retry from step 2.
- Touch "SELFDIAG RESULT".
Which is displayed on CONSULT?
OK >> INSPECTION END
NG >> Proceed to EC, "Diagnosis Procedure".
4.PERFORM DTC CONFIRMATION PROCEDURE A
With GST
- Turn ignition switch ON.
- Check the voltage between ECM harness connector and ground.

- Start engine and wait at least 60 seconds.
- Check 1st trip DTC.
Is 1st trip DTC detected?
YES >> Proceed to EC, "Diagnosis Procedure".
NO >> GO TO 5.
5.PERFORM DTC CONFIRMATION PROCEDURE
With GST
- Start engine and warm it up to normal operating temperature.
- Turn ignition switch OFF and wait at least 10 seconds.
- Start engine and let it idle for at least 20 seconds.
- Check 1st trip DTC.
Is 1st trip DTC detected?
YES >> Proceed to EC, "Diagnosis Procedure".
NO >> INSPECTION END
Diagnosis Procedure
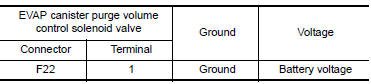
1.CHECK EVAP CANISTER PURGE VOLUME CONTROL SOLENOID VALVE POWER SUPPLY
- Turn ignition switch OFF.
- Disconnect EVAP canister purge volume control solenoid valve harness connector.
- Turn ignition switch ON.
- Check the voltage between EVAP canister purge volume control solenoid
valve harness connector and
ground.
Is the inspection result normal?
YES >> GO TO 3.
NO >> GO TO 2.
2.CHECK EVAP CANISTER PURGE VOLUME CONTROL SOLENOID VALVE POWER SUPPLY CIRCUIT
- Turn ignition switch OFF.
- Disconnect IPDM E/R harness connector.
- Check the continuity between EVAP canister purge volume control solenoid
valve harness connector and
IPDM E/R harness connector.
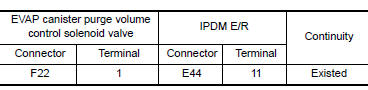
- Also check harness for short to ground.
Is the inspection result normal?
YES >> Perform the trouble diagnosis for power supply circuit.
NO >> Repair or replace errordetected parts.
3.CHECK EVAP CANISTER PURGE VOLUME CONTROL SOLENOID VALVE GROUND CIRCUIT
- Turn ignition switch OFF.
- Disconnect ECM harness connector.
- Check the continuity between EVAP canister purge volume control solenoid
valve harness connector and
ECM harness connector.
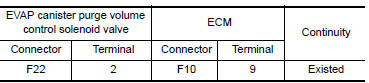
- Also check harness for short to power.
Is the inspection result normal?
YES >> GO TO 4.
NO >> Repair or replace errordetected parts.
4.CHECK EVAP CONTROL SYSTEM PRESSURE SENSOR CONNECTOR
- Disconnect EVAP control system pressure sensor harness connector.
- Check connectors for water.
Is the inspection result normal?
YES >> GO TO 5.
NO >> Replace EVAP control system pressure sensor. Refer to FL, "Removal and Installation".
5.CHECK EVAP CONTROL SYSTEM PRESSURE SENSOR
Check the EVAP control system pressure sensor. Refer to EC, "Component Inspection".
Is the inspection result normal?
YES1 >> With CONSULT: GO TO 6.
YES2 >> Without CONSULT: GO TO 7.
NO >> Replace EVAP control system pressure sensor. Refrt to FL, "Removal and Installation".
6.CHECK EVAP CANISTER PURGE VOLUME CONTROL SOLENOID VALVE
With CONSULT
- Turn ignition switch OFF.
- Reconnect harness connectors disconnected.
- Start engine.
- Perform "PURG VOL CONT/V" in "ACTIVE TEST" mode of "ENGINE" using CONSULT. Check that engine speed varies according to the valve opening.
Is the inspection result normal?
YES >> GO TO 8.
NO >> GO TO 7.
7.CHECK EVAP CANISTER PURGE VOLUME CONTROL SOLENOID VALVE
Check the EVAP canister purge volume control solenoid valve. Refer to EC, "Component Inspection".
Is the inspection result normal?
YES >> GO TO 8.
NO >> Replace EVAP canister purge volume control solenoid valve. Refer to EM, "Removal and Installation".
8.CHECK RUBBER TUBE FOR CLOGGING
- Disconnect rubber tube connected to EVAP canister vent control valve.
- Check the rubber tube for clogging.
Is the inspection result normal?
YES >> GO TO 9.
NO >> Clean the rubber tube using an air blower.
9.CHECK EVAP CANISTER VENT CONTROL VALVE
Check the EVAP canister vent control valve. Refer to EC, "Component Inspection".
Is the inspection result normal?
YES >> GO TO 10.
NO >> Replace EVAP canister vent control valve. Refer to FL, "Removal and Installation".
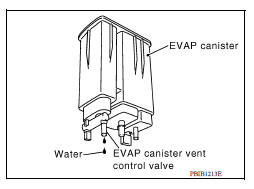
10.CHECK IF EVAP CANISTER IS SATURATED WITH WATER
- Remove EVAP canister with EVAP canister vent control valve and EVAP control system pressure sensor attached.
- Check if water will drain from EVAP canister.
Does water drain from the EVAP canister?
YES >> GO TO 11.
NO >> Check intermittent incident. Refer to GI, "Intermittent Incident".
11.CHECK EVAP CANISTER
Weigh the EVAP canister with the EVAP canister vent control valve and EVAP control system pressure sensor attached.
The weight should be less than 1.6 kg (3.5 lb).
Is the inspection result normal?
YES >> Check intermittent incident. Refer to GI, "Intermittent Incident".
NO >> GO TO 12.
12.DETECT MALFUNCTIONING PART
Check the following.
- EVAP canister for damage
- EVAP hose between EVAP canister and vehicle frame for clogging or poor connection
>> Repair hose or replace EVAP canister. Refer to FL, "Removal and Installation".
Component Inspection
1.CHECK EVAP CANISTER PURGE VOLUME CONTROL SOLENOID VALVE
With CONSULT
- Turn ignition switch OFF.
- Reconnect all harness connectors disconnected.
- Disconnect EVAP purge hoses connected to EVAP canister purge volume control solenoid valve.
- Turn ignition switch ON.
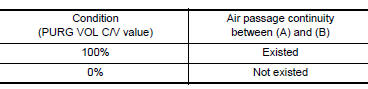
- Select "PURG VOL CONT/V" in "ACTIVE TEST" mode of "ENGINE" using CONSULT.
- Touch "Qd" and "Qu" on CONSULT screen to adjust "PURG
VOL C/V" opening and check air passage continuity of EVAP
canister purge volume control solenoid valve as per the following
conditions.
Without CONSULT
- Turn ignition switch OFF.
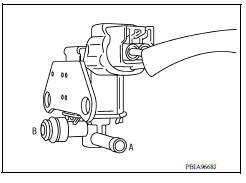
- Disconnect EVAP canister purge volume control solenoid valve harness connector.
- Disconnect EVAP purge hoses connected to EVAP canister purge volume control solenoid valve.
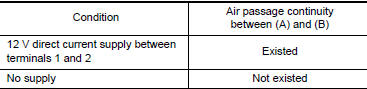
- Check air passage continuity of EVAP canister purge volume control
solenoid valve as per the following
conditions.
Is the inspection result normal?
YES >> INSPECTION END
NO >> Replace EVAP canister purge volume control solenoid valve. Refer to EM, "Removal and Installation".
 P0441 EVAP control system
Other materials:
Fuel injector and fuel tube
Exploded View
1. Stud bolt 2. Oring (green) 3. Fuel injector (front) 4. Clip 5. Fuel
injector (rear) 6. Oring (black) 7. Fuel tube protector 8. Fuel tube 9. Clamp
10. Quick connector cap (engine side) 11. Fuel feed hose 12. Quick connector cap
(floor pipingside) 13. Fuel connector protect ...
Multiport fuel injection system
MULTIPORT FUEL INJECTION SYSTEM : System Diagram
MULTIPORT FUEL INJECTION SYSTEM : System
Description
INPUT/OUTPUT SIGNAL CHART
Sensor
Input signal to ECM
ECM function
Actuator
Crankshaft position sensor (POS)
Engine speed*4
Piston position
Fuel injection & ...
Categories
- Manuals Home
- Nissan Versa Owners Manual
- Nissan Versa Service Manual
- Video Guides
- Questions & Answers
- External Resources
- Latest Updates
- Most Popular
- Sitemap
- Search the site
- Privacy Policy
- Contact Us

0.0059