Nissan Versa (N17): Door check link
DOOR CHECK LINK : Removal and Installation
REMOVAL
- Fully close the rear door window.
- Remove rear door finisher. Refer to INT-15, "Removal and Installation".
- Remove rear door speaker bolts (if equipped).
- Disconnect harness connector and remove rear door speaker (if equipped).
- Remove sealing screen (lower) if vehicle is not equipped with rear door speakers.
- Remove door check link bolts from body.
- Remove door check link bolts from door panel.
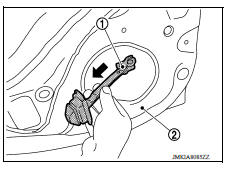
- Remove door check link (1) through the hole in rear door panel (2).
INSTALLATION
Installation is in the reverse order of removal.
CAUTION:
- After installation, check rear door open/close, lock/unlock operation.
- Check door check link rotating point for poor lubrication. If necessary, apply a suitable multi-purpose grease.

TRUNK LID
Exploded View
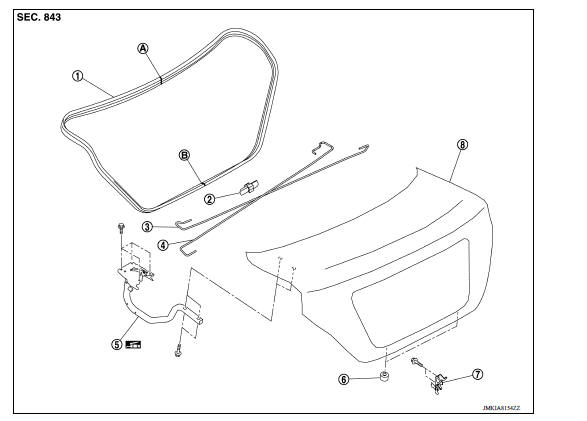
1. Trunk lid weatherstrip 2. Torsion bar clip 3. Torsion bar (RH) 4. Torsion bar (LH) 5. Trunk lid hinge (LH) 6. Bumper rubber 7. Trunk lid striker 8. Trunk lid assembly A Center mark B Seam
 Door hinge
DOOR HINGE : Removal and Installation CAUTION: Use two people when removing or installing rear door due to its heavy weight. When removing and installing rear door assembly, support door ...

Other materials:
Wiper and washer switch
Switch operation
Type A (if so equipped)
The windshield wiper and washer operates when
the ignition switch is in the ON position.
Push the lever down to operate the wiper at the
following speed:
Intermittent (INT) - intermittent operation
can be adjusted by turning the knob toward
...
Windows
Power windows (if so equipped)
WARNING
Make sure that all passengers have
their hands, etc. inside the vehicle while
it is in motion and before closing the
windows. Use the window lock switch to
prevent unexpected use of the power
windows
To help avoid risk of injury or death
thr ...
Categories
- Manuals Home
- Nissan Versa Owners Manual
- Nissan Versa Service Manual
- Video Guides
- Questions & Answers
- External Resources
- Latest Updates
- Most Popular
- Sitemap
- Search the site
- Privacy Policy
- Contact Us

0.0052