
Nissan Versa (N17): Fender cover
FENDER COVER : Removal and Installation
REMOVAL
- Fully open hood assembly.
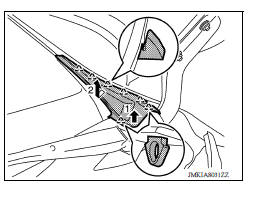
- Disengage pawls beginning at the front of the fender cover and working toward the rear of vehicle and then remove front fender cover.
CAUTION: When performing the procedure after removing fender cover, protect the lower windshield glass with urethane etc.
 : Pawl
INSTALLATION
Installation is in the reverse order of removal.
CAUTION:
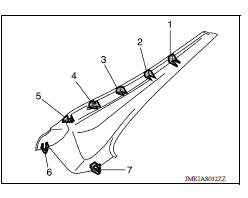
- For installation, engage pawls to front fender and cowl top cover in numerical order shown.
- Install so that there is no clearance between windshield and cowl top cover.
FRONT DOOR
Exploded View
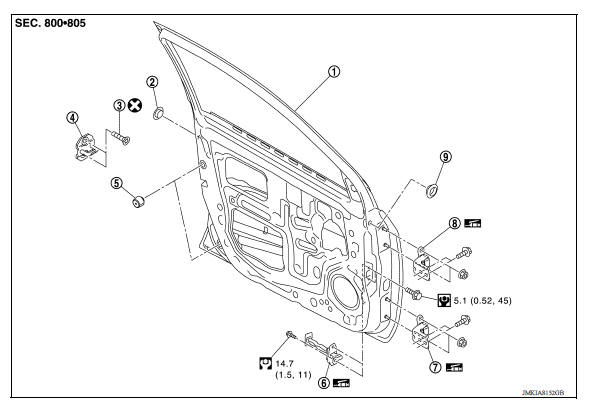
1. Front door assembly 2. Grommet 3. Striker bolt 4. Door striker 5. Bumper rubber 6. Door check link 7. Door hinge (lower) 8. Door hinge (upper) 9. Grommet (Drive side only)
 Front fender
FRONT FENDER : Removal and Installation CAUTION: Use a shop cloths to protect the body from being damaged during removal and installation. REMOVAL Remove fender protector. Refer to EXT " ...

Other materials:
Clutch master cylinder
Exploded View
1. Reservoir hose 2. Master cylinder
Removal and Installation
CAUTION:
Do not spill clutch fluid onto painted surfaces. If fluid spills,
wipe up immediately and wash the
affected area with water.
Do not disassemble clutch master cylinder.
NOTE:
When removing compo ...
Vacuum lines
Exploded View
1. Clamp 2. Vacuum hose 3. Vacuum piping
A. To brake booster B. Paint mark C. To intake manifold
Removal and Installation
REMOVAL
Remove the air cleaner and duct assembly. Refer to EM "Exploded View".
Remove the vacuum hose and vacuum piping.
INSTALLATION
...
Categories
- Manuals Home
- Nissan Versa Owners Manual
- Nissan Versa Service Manual
- Video Guides
- Questions & Answers
- External Resources
- Latest Updates
- Most Popular
- Sitemap
- Search the site
- Privacy Policy
- Contact Us

0.0075