
Nissan Versa (N17): Fluid cooler tube
Exploded View
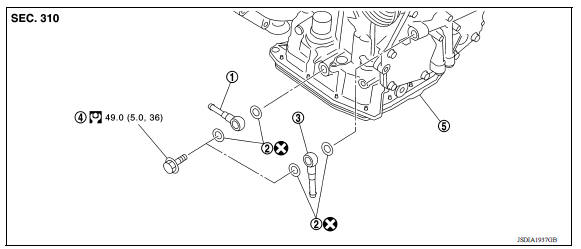
1. Fluid cooler tube A 2. Copper sealing washer 3. Fluid cooler tube B 4. Bolt 5. Transaxle assembly
Removal and Installation
WARNING:
- Do not open the radiator cap or drain plug when the engine is hot. There is a danger that hot liquid may spray out, causing serious injury.
- Perform these steps after the coolant temperature has cooled sufficiently.
CAUTION: Do not reuse copper sealing washers.
NOTE: Lift up the vehicle and perform the work from below.
REMOVAL
- Remove fluid cooler hose and fluid cooler tube A.
- Disconnect the washer from fluid cooler tube A.
- Remove fluid cooler hose and fluid cooler tube B.
- Disconnect the washer from fluid cooler tube B.
INSTALLATION
Installation is in the reverse order of removal.
CAUTION: Do not reuse copper sealing washers.
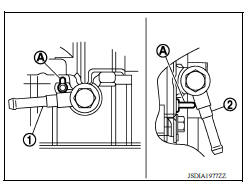
When installing the fluid cooler tube A (1) and B (2) onto the transaxle assembly, install it so that it is in contact with the transaxle case rib (A).
Inspection and Adjustment
INSPECTION AFTER INSTALLATION
Check for A/T fluid leakage. Refer to TM "Inspection".
ADJUSTMENT AFTER INSTALLATION
Check the A/T fluid level. Refer to TM "Adjustment".
Fluid cooler hose
Exploded View
Removal and Installation
Inspection and Adjustment
INSPECTION AFTER INSTALLATION
Check for A/T fluid leakage. Refer to TM "Inspection".
ADJUSTMENT AFTER INSTALLATION
Adjust the A/T fluid level. Refer to TM "Adjustment".
 Differential side oil seal
Exploded View 1. Transaxle assembly 2. Differential side oil seal (left side) 3. Differential side oil seal (right side) Front Genuine NISSAN Matic S ATF Removal and Installation NOTE: W ...
Transmission assembly
Exploded View 1. Transaxle assembly A. : Tightening must be done following the installation procedure. Refer to TM "Removal and Installation". ...
Other materials:
Engine assembly
Exploded View
1. Engine mounting (RH) stay 2. Engine mount (RH) stay 3. Engine mounting
insulator (RH)
4. Rear engine mounting bracket 5. Rear torque rod 6. Engine mounting bracket
(LH)
7. Engine mounting bracket (LH) 8. Engine mounting insulator (LH) 9. Mass damper
A. Front mark B. Tra ...
Oil pump
Exploded View
1. Rear oil seal 2. Oring 3. Oil pan (upper)
4. Oil pump chain tensioner (for oil
pump drive chain)
5. Oil pump drive chain 6. Crankshaft key
7. Crankshaft sprocket 8. Oil pump sprocket 9. Oil pump
10. Oring 11. Oring 12. Oil pan drain plug
13. Drain plug washer 14. Oil pan ( ...
Categories
- Manuals Home
- Nissan Versa Owners Manual
- Nissan Versa Service Manual
- Video Guides
- Questions & Answers
- External Resources
- Latest Updates
- Most Popular
- Sitemap
- Search the site
- Privacy Policy
- Contact Us

0.0054