Nissan Versa (N17): Front combination lamp
Exploded View
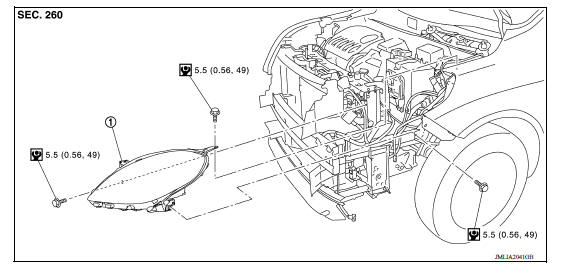
1. Front combination lamp (LH)
Removal and Installation
REMOVAL
1. Disconnect the battery negative terminal. Refer to PG "Removal and Installation".
2. Remove front bumper fascia. Refer to EXT "Removal and Installation".
3. Remove the front combination lamp bolts.
4. Pull the headlamp assembly forward slightly.
5. Disconnect the harness connectors from the front combination lamp and remove.
INSTALLATION
Installation is in the reverse order of removal.
NOTE: After installation, perform headlamp aiming adjustment procedure. Refer to EXL "Aiming Adjustment Procedure".
Bulb Replacement
WARNING: Do not touch bulb with your hand while it is on or right after being turned off. Burning may result.
CAUTION:
- Disconnect the battery negative terminal or remove power circuit fuse while performing the operation.
- Do not touch the glass surface of the bulb with bare hands or allow oil or grease to get on it to prevent damage to the bulb.
- Do not leave bulb out of lamp reflector for a long time because dust, moisture smoke, etc. may affect the performance of lamp. When replacing bulb, be sure to replace it with new one.
HEADLAMP BULB
Removal
1. Disconnect the harness connector from the headlamp bulb.
2. Remove the cover.
3. Remove the retaining spring lock and the bulb from the front combination lamp.
Installation
Installation is in the reverse order of removal.
CAUTION: After installing the bulb, install the bulb socket securely for watertightness.
PARKING LAMP BULB
Removal
1. Rotate the bulb socket counterclockwise and remove.
2. Remove the bulb from the bulb socket.
Installation
Installation is in the reverse order of removal.
CAUTION: After installing the bulb, install the bulb socket securely for watertightness.
FRONT TURN SIGNAL LAMP BULB
Removal
1. Rotate the bulb socket counterclockwise and remove.
2. Remove the bulb from the bulb socket.
Installation
Installation is in the reverse order of removal.
CAUTION: After installing the bulb, install the bulb socket securely for watertightness.
Disassembly and Assembly
Exploded View

1. Front combination lamp 2. Parking lamp bulb 3. Parking lamp bulb socket 4. Cover 5. Halogen bulb 6. Front turn signal lamp bulb socket 7. Front turn signal lamp bulb 8. Retaining spring
WARNING: Do not touch bulb with your hand while it is on or right after being turned off. Burning may result.
CAUTION:
- Disconnect the battery negative terminal or remove power circuit fuse while performing the operation.
- After installing the bulb, install cover and the bulb socket securely for watertightness.
- Do not touch the glass surface of the bulb with bare hands or allow oil or grease to get on it to prevent damage to the bulb.
- Do not leave bulb out of lamp reflector for a long time because dust, moisture smoke, etc. may affect the performance of lamp. When replacing bulb, be sure to replace it with new one.
DISASSEMBLY
1. Remove the cover.
2. Remove the retaining spring lock and bulb.
3. Rotate the parking lamp bulb socket counterclockwise and remove.
4. Remove the bulb from the parking lamp bulb socket.
5. Rotate the front turn signal lamp bulb socket counterclockwise and remove.
6. Remove the bulb from the front turn signal lamp bulb socket.
ASSEMBLY
Assembly is in the reverse order of disassembly.
 Front fog lamp aiming adjustment
Front fog lamp
Exploded View 1. Front fog lamp bulb 2. Front fog lamp 3. Front bumper fascia 4. Front fog lamp finisher ...
Other materials:
P0607 ECM
DTC Logic
DTC DETECTION LOGIC
DTC No.
Trouble diagnosis
(Trouble diagnosis content)
DTC detecting condition
Possible cause
P0607
ECM
(CAN communication bus)
When detecting error during the initial diagnosis
of CAN controller of ECM.
ECM
DTC CO ...
Side air bag module
Removal and Installation
REMOVAL
WARNING:
Do not leave any objects (screwdrivers, tools, etc.) on the seat during seatback
repair. It can lead to
personal injury if the side air bag should accidentally deploy.
CAUTION:
Before servicing, turn ignition switch OFF, disconnect both
battery ...
Categories
- Manuals Home
- Nissan Versa Owners Manual
- Nissan Versa Service Manual
- Video Guides
- Questions & Answers
- External Resources
- Latest Updates
- Most Popular
- Sitemap
- Search the site
- Privacy Policy
- Contact Us

0.0056