
Nissan Versa (N17): Hood assembly
Hood assembly : Removal and Installation
CAUTION:
- Use two people when removing or installing hood assembly due to its heavy weight.
- Use protective tape or shop cloths to protect surrounding components from damage during removal and installation of hood assembly.
REMOVAL
- Support hood assembly using a suitable tool.
WARNING: Bodily injury may occur if hood assembly is not supported properly when removing hood assembly.
- Remove hood hinge to hood nuts and then remove the hood assembly.
CAUTION: Use two people when removing or installing hood assembly due to its heavy weight.
INSTALLATION
Installation is in the reverse order of removal.
CAUTION:
- After installation, perform the hood assembly adjustment procedure. Refer to DLK "HOOD ASSEMBLY : Adjustment".
- After adjusting, apply touch-up paint (tbody color) onto the head of hood hinge bolts and nuts.
Hood assembly : Adjustment
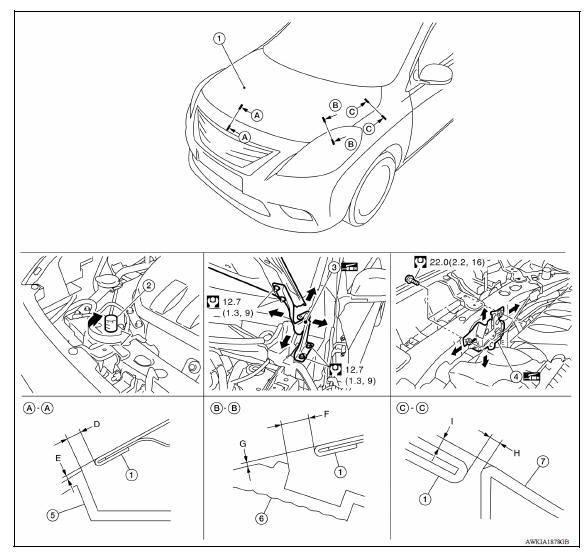
1. Hood assembly 2. Hood bumper rubber 3. Hood hinge (LH) 4. Hood lock assembly 5. Front bumper fascia 6. Front combination lamp (LH) 7. Front fender
Check the clearance and the surface height between hood and each part by visual inspection and tactile feel.
If the clearance and the surface height are out of specification, adjust them
according to the adjustment procedure.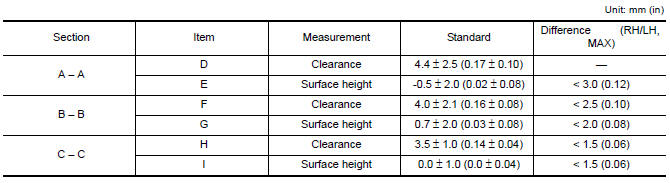
ADJUSTMENT PROCEDURE
1. Remove hood lock assembly, and then adjust the surface height of hood assembly, front fender assembly, and front combination lamp according to the specifications provided torque of 22 N*m (2.2 kg-m, 16 ft-lb).
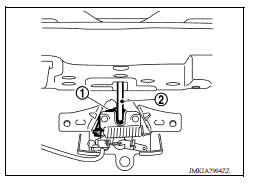
2. Position hood lock assembly (1) and engage primary striker (2).
Check hood lock assembly and primary striker for looseness.
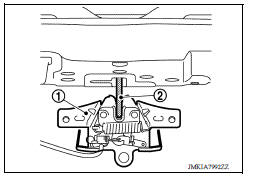
3. Move hood lock assembly laterally until the center of primary striker and hood lock assembly are vertical when viewed from the front.
4. After adjustment, tighten hood lock assembly bolts to the specified torque.
5. Rotate bumper rubber a minimum of 1/8 of a rotation counterclockwise in an upward direction.
CAUTION: If any looseness is felt in hood striker or hood lock assembly, rotate bumper rubber more than 1/8 of a rotation.
6. Check that secondary latch (1) is securely engaged with secondary striker (2) from the dead load of the hood assembly.
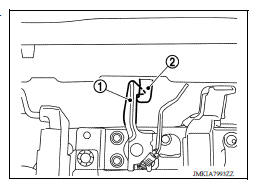
7. Check that primary latch (1) is securely engaged with primary striker (2) when hood is dropped with hood's own weight from approximately 200 mm (7.9 in) height.
8. Close hood assembly with a static closing force of 300 - 490 N (30.6 - 50.0 kg-f, 67.4 - 110 lb-f).
 Squeak and rattle trouble diagnoses
Hood hinge
HOOD HINGE : Removal and Installation REMOVAL Remove hood assembly. Refer to DLK "HOOD ASSEMBLY : Removal and Installation". Remove hood support rod and grommet. Refer to DLK" ...
Other materials:
B terminal circuit
Description
Terminal "B" is constantly supplied with battery power.
Diagnosis Procedure
Regarding Wiring Diagram information, refer to STR, "Wiring Diagram - With
Intelligent Key System" or
STR, "Wiring Diagram - Without Intelligent Key System".
CAUTION: Perform diagnosis ...
Front wheel hub and knuckle
Inspection
Check the axle and suspension parts for excessive play, wear, or damage.
Shake each front wheel to check for excessive play as shown.
FRONT WHEEL BEARING INSPECTION
Move wheel hub and bearing assembly in the axial direction by hand. Make
sure the axial end play is withi ...
Categories
- Manuals Home
- Nissan Versa Owners Manual
- Nissan Versa Service Manual
- Video Guides
- Questions & Answers
- External Resources
- Latest Updates
- Most Popular
- Sitemap
- Search the site
- Privacy Policy
- Contact Us

0.0201