Nissan Versa (N17): How to erase permanent DTC
Description
OUTLINE
When a DTC is stored in ECM When a DTC is stored in ECM and MIL is ON, a permanent DTC is erased with MIL shutoff if the same malfunction is not detected after performing the driving pattern for MIL shutoff three times in a raw.
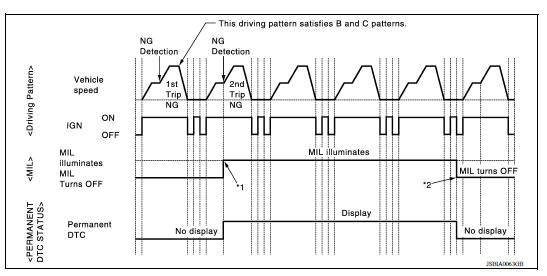
*1: When the same malfunction is detected in two consecutive trips, MIL will illuminate.
*2: MIL will turn off after vehicle is driven 3 times (driving pattern B) without any malfunctions.
When a DTC is not stored in ECM The erasing method depends on a permanent DTC stored in ECM. Refer to the following table.
NOTE: If the applicable permanent DTC includes multiple groups, perform the procedure of Group B first. If the permanent DTC is not erased, perform the procedure of Group A.
×: Applicable -: Not applicable

*: For group, refer to EC, "DTC Index".
PERMANENT DTC ITEM
For permanent DTC items, MIL turns ON.
PERMANENT DTC SERVICE PROCEDURE
Work Procedure (Group A)
*1: When the same malfunction is detected in two consecutive trips, MIL will illuminate.
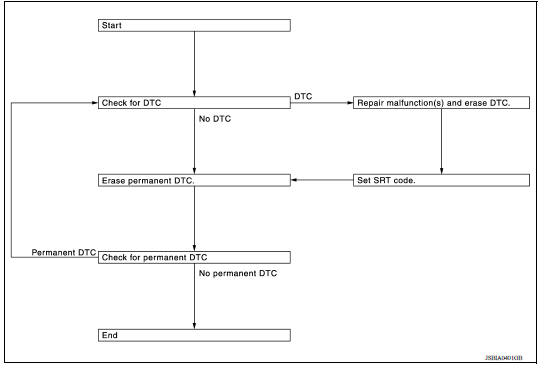
1.CHECK DTC
Check DTC.
Is any DTC detected?
YES >> Repair malfunction(s) and erase DTC.
NO >> GO TO 2.
2.CHECK PERMANENT DTC
 With CONSULT
- Turn ignition switch OFF and wait at least 10 seconds.
- Turn ignition switch ON.
- Turn ignition switch OFF and wait at least 10 seconds.
- Turn ignition switch ON.
- Select "PERMANENT DTC STATUS" mode with CONSULT.
 With GST
- Turn ignition switch OFF and wait at least 10 seconds.
- Turn ignition switch ON.
- Turn ignition switch OFF and wait at least 10 seconds.
- Turn ignition switch ON.
- Select Service $0A with GST.
Is any permanent DTC detected?
YES >> GO TO 3.
NO >> END
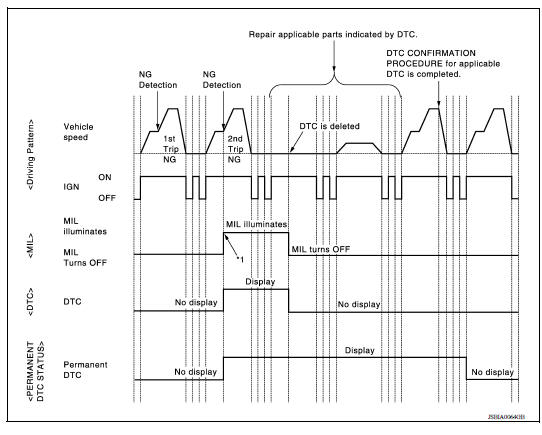
3.PERFORM DTC CONFIRMATION PROCEDURE
Perform "DTC CONFIRMATION PROCEDURE" for DTCs which are the same as permanent DTCs stored in ECM.
>> GO TO 4.
4.CHECK PERMANENT DTC
With CONSULT
- Turn ignition switch OFF and wait at least 10 seconds.
- Turn ignition switch ON.
- Turn ignition switch OFF and wait at least 10 seconds.
- Turn ignition switch ON.
- Select "PERMANENT DTC STATUS" mode with CONSULT.
With GST
- Turn ignition switch OFF and wait at least 10 seconds.
- Turn ignition switch ON.
- Turn ignition switch OFF and wait at least 10 seconds.
- Turn ignition switch ON.
- Select Service $0A with GST.
Is any permanent DTC detected?
YES >> GO TO 1.
NO >> END
Work Procedure (Group B)
*1: When the same malfunction is detected in two consecutive trips, MIL will illuminate.
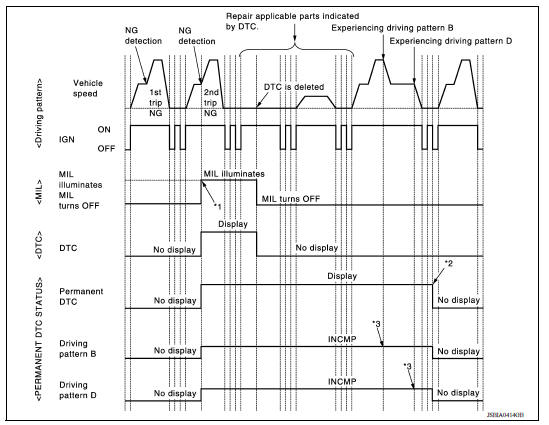
*2: After experiencing driving pattern B and D, permanent DTC is erased.
*3: Indication does not change unless the ignition switch is turned from ON to OFF twice even after experiencing driving pattern B or D.
NOTE: Drive the vehicle according to only driving patterns indicating "INCMP" in driving patterns B and D on the "PERMANENT DTC STATUS" screen.
1.CHECK DTC
Check DTC.
Is any DTC detected?
YES >> Repair malfunction(s) and erase DTC.
NO >> GO TO 2.
2.CHECK PERMANENT DTC
With CONSULT
- Turn ignition switch OFF and wait at least 10 seconds.
- Turn ignition switch ON.
- Turn ignition switch OFF and wait at least 10 seconds.
- Turn ignition switch ON.
- Select "PERMANENT DTC STATUS" mode with CONSULT.
With GST
- Turn ignition switch OFF and wait at least 10 seconds.
- Turn ignition switch ON.
- Turn ignition switch OFF and wait at least 10 seconds.
- Turn ignition switch ON.
- Select Service $0A with GST.
Is any permanent DTC detected?
YES >> GO TO 3.
NO >> END
3.DRIVE DRIVING PATTERN B
CAUTION:
- Always drive at a safe speed.
- Never erase selfdiagnosis results.
- If selfdiagnosis results are erased during the trip of driving pattern B or D, the counter of driving pattern B and D is reset.
With CONSULT
- Start engine and warm it up to normal operating temperature.
- Use "PERMANENT DTC WORK SUPPORT" mode with CONSULT to drive the vehicle according to driving pattern B.
With GST
- Start engine and warm it up to normal operating temperature.
- Drive the vehicle according to driving pattern B.
>> GO TO 4.
4.CHECK PERMANENT DTC
With CONSULT
- Turn ignition switch OFF and wait at least 10 seconds.
- Turn ignition switch ON.
- Turn ignition switch OFF and wait at least 10 seconds.
- Turn ignition switch ON.
- Select "PERMANENT DTC STATUS" mode with CONSULT.
With GST
- Turn ignition switch OFF and wait at least 10 seconds.
- Turn ignition switch ON.
- Turn ignition switch OFF and wait at least 10 seconds.
- Turn ignition switch ON.
- Select Service $0A with GST.
Is any permanent DTC detected?
YES >> GO TO 5.
NO >> END
5.DRIVE DRIVING PATTERN D
CAUTION:
- Always drive at a safe speed.
- Never erase selfdiagnosis results.
- If selfdiagnosis results are erased during the trip of driving pattern B or D, the counter of driving pattern B and D is reset.
Drive the vehicle according to driving pattern D. Refer to EC, "Work Procedure (Group B)".
>> GO TO 6.
6.CHECK PERMANENT DTC
With CONSULT
- Turn ignition switch OFF and wait at least 10 seconds.
- Turn ignition switch ON.
- Turn ignition switch OFF and wait at least 10 seconds.
- Turn ignition switch ON.
- Select "PERMANENT DTC STATUS" mode with CONSULT.
With GST
- Turn ignition switch OFF and wait at least 10 seconds.
- Turn ignition switch ON.
- Turn ignition switch OFF and wait at least 10 seconds.
- Turn ignition switch ON.
- Select Service $0A with GST.
Is any permanent DTC detected?
YES >> GO TO 1.
NO >> END
 How to set SRT code
Other materials:
Air conditioning cut control
AIR CONDITIONING CUT CONTROL : System Diagram
AIR CONDITIONING CUT CONTROL : System
Description
INPUT/OUTPUT SIGNAL CHART
Sensor
Input signal to ECM
ECM function
Actuator
Crankshaft position sensor (POS)
Camshaft position sensor (PHASE)
Engine speed*1
Pisto ...
Malfunction indicator lamp
Component Function Check
1.CHECK MIL FUNCTION
Turn ignition switch ON.
Make sure that MIL lights up.
Is the inspection result normal?
YES >> INSPECTION END
NO >> Go to EC, "Diagnosis Procedure".
Diagnosis Procedure
1.CHECK DTC
Check that DTC UXXXX is not display ...
Categories
- Manuals Home
- Nissan Versa Owners Manual
- Nissan Versa Service Manual
- Video Guides
- Questions & Answers
- External Resources
- Latest Updates
- Most Popular
- Sitemap
- Search the site
- Privacy Policy
- Contact Us

0.0059