Nissan Versa (N17): Control panel buttons - color screen with Navigation System (if so equipped)
WARNING
- Positioning of the heating or air conditioning controls and display controls should not be done while driving in order that full attention may be given to the driving operation.
- Do not disassemble or modify this system.
If you do, it may result in accidents, fire, or electrical shock.
- Do not use this system if you notice any abnormality, such as a frozen screen or lack of sound. Continued use of the system may result in accident, fire or electric shock.
- In case you notice any foreign object in the system hardware, spill liquid on it, or notice smoke or smell coming from it, stop using the system immediately. Ignoring such conditions may lead to accidents, fire or electrical shock. It is recommended that you visit a NISSAN dealer for servicing.
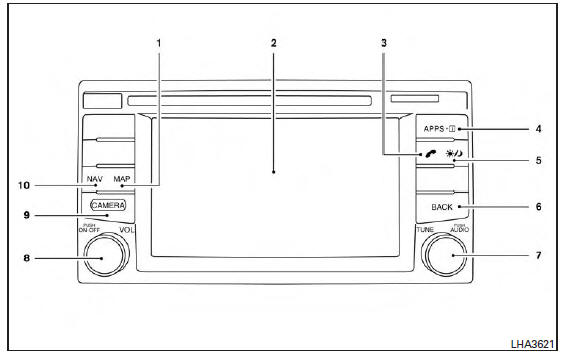
1. MAP button*
2. Display screen
3.  button**
4.  button
5.  (brightness control) button
6. BACK button
7. AUDIO button / TUNE knob
8. ON-OFF button/VOL (volume) control knob
9. CAMERA button
10. NAV button*
*For additional information regarding the Navigation system control buttons, refer to the separate Navigation System Owner's Manual.
**For additional information regarding the Bluetooth Hands-Free Phone System control button, refer to "Bluetooth Hands-Free Phone System with Navigation System" in this section.
When you use this system, make sure the engine is running.
If you use the system with the engine not running (ignition ON or ACC) for a long time, it will discharge the battery, and the engine will not start.
Reference symbols: "Example" - Words marked in quotes refer to a key shown only on the display. These keys can be selected by touching the screen.
How to use the touch-screen
CAUTION
- The glass display screen may break if it
is hit with a hard or sharp object. If the
glass screen breaks, do not touch it.
Doing so could result in an injury
- To clean the display, never use a rough cloth, alcohol, benzine, thinner or any kind of solvent or paper towel with a chemical cleaning agent. They will scratch or deteriorate the panel.
- Do not splash any liquid such as water or car fragrance on the display. Contact with liquid will cause the system to malfunction.
To help ensure safe driving, some functions cannot be operated while driving.
The on-screen functions that are not available while driving will be "grayed out" or muted.
Park the vehicle in a safe location and then operate the navigation system.
WARNING
- ALWAYS give your full attention to driving.
- Avoid using vehicle features that could distract you. If distracted, you could lose control of your vehicle and cause an accident.
Touch-screen operation
Touch-screen operation
| Menu Item | Result | |
| Selecting the item | Touch an item to select . To select the "Audio" key, touch the "Audio" key on the screen. Press the "BACK" button to return to the previous screen. | |
| Adjusting the item | Touch the "+" key or the " " key to adjust the settings of an item. Touch the up arrow to scroll up the page one item at a time to scroll up an entire page. Touch the down arrow to scroll down the page one item at a time to scroll down an entire page. | |
| Inputting characters | Touch the letter or number key. There are some options available when inputting characters. | |
| 123/ABC | Changes the available character set to numbers. | |
| Space | Inserts a space. | |
| Delete | Deletes the last inputted character with one touch. Touch and hold the "Delete" key to delete all of the characters. | |
| OK | Completes the character input. | |
Touch-screen maintenance
If you clean the display screen, use a dry, soft cloth. If additional cleaning is necessary, use a small amount of neutral detergent with a soft cloth. Never spray the screen with water or detergent.
Dampen the cloth first and then wipe the screen.
How to use the BACK button
Press the BACK button to return to the previous screen.
How to use the button
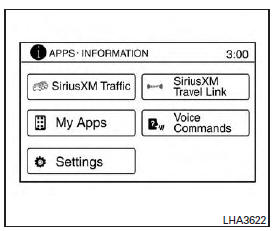
For additional information about the "SiriusXM Travel Link", and "Traffic" features, refer to the separate Navigation System Owner's Manual.
For additional information about the "My Apps" key, refer to "NissanConnectSM Mobile Apps" in this section.
For additional information about the "Voice Commands" key, refer to "NISSAN Voice Recognition System" in this section.
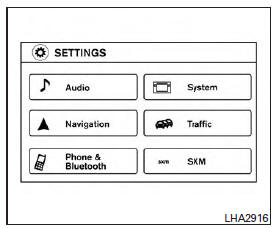
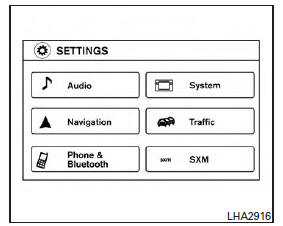
To select and/or adjust several functions, features
and modes that are available for your vehicle:
1. Press the  button.
2. Touch the "Settings" key.
3. Touch the desired item.
| Menu item | Result | |
| Audio | For additional information, refer to "Audio system" in this section. | |
| Navigation | For additional information, refer to the separate Navigation System Owner's Manual. | |
| Phone & Bluetooth | For additional information, refer to "Bluetooth Hands-Free Phone System with Navigation System" in this section. | |
| System | Touch this key to select and/or adjust various functions of this system. A screen with additional options will appear. | |
Display
|
Touch this key to adjust the appearance of the display.
|
|
Clock
|
Touch this key to adjust the time
|
|
| Language | Touch this key to change the language on the display | |
Camera Settings
Temperature Unit
|
Touch this key to change the camera settings
|
|
| Traffic (if so equipped) | Touch this key to display traffic settings. For additional information, refer to the separate Navigation System Owner's Manual | |
| SXM (if so equipped) | Touch this key to start SiriusXM radio. For additional information, refer to "Audio system" in this section. | |
 button) is pressed
and held for
2 seconds.
button) is pressed
and held for
2 seconds.Clock Set
1. Press the [  ] button.
2. Touch the "Settings" key.
3. Touch the "System" key 4. Touch the "Clock" key.
5. Touch "Clock Mode" to select "Manual" to adjust time manually.
6. Touch "Set Clock Manually".
7. Touch "+" and "-" keys to adjust hour, minute, day, month and year.
8. Press the BACK button to finish.
 button
To change the display brightness, press
the button. Pressing
the button again will
change the display to the day or the night display.
If no operation is performed within 5 seconds, the display will return to the previous display.
Press and hold the button
for more than
2 seconds to turn the display off and show the
clock, press the button again to turn the display
back on.
How to use the ON-OFF button/VOL (volume) control knob
Press the ON-OFF button to turn audio function on and off. Turn the VOL (volume) control knob to adjust audio volume.
How to use the CAMERA button
For additional information, refer to "RearView Monitor" in this section.
 Mirrors
RearView Monitor (if so equipped)
1. CAMERA button (models with navigation) WARNING Failure to follow the warnings and instructions for proper use of the Rear- View Monitor system could result in serious injury or death ...
Other materials:
Valve oil seal
VALVE OIL SEAL : Removal and Installation
REMOVAL
Remove camshafts.
Remove valve lifters.
Rotate crankshaft, and set piston with valve oil seal to be removed to
TDC. This will prevent the valve
from dropping into cylinder.
CAUTION:
When rotating crankshaft, be careful to avoid ...
Seat belt warning lamp system
SEAT BELT WARNING LAMP SYSTEM : System Diagram
SEAT BELT WARNING LAMP SYSTEM : System Description
The seat belt warning lamp (1) will remind the driver if the driver or front
passenger seat belt should be buckled.
The system works in conjunction with the occupant classification system. R ...
Categories
- Manuals Home
- Nissan Versa Owners Manual
- Nissan Versa Service Manual
- Video Guides
- Questions & Answers
- External Resources
- Latest Updates
- Most Popular
- Sitemap
- Search the site
- Privacy Policy
- Contact Us

0.007